1/6 1/6 DIECAST Iron Man 2 WAR MACHINE

Collector Freaks Forum

Help Support Collector Freaks Forum:

This site may earn a commission from merchant affiliate links, including eBay, Amazon, and others.
Well damn. Got my figure all set up and of course there's an issue. The shoulder joint at the top of the left arm is insanely loose making it impossible to keep the arm lifted even halfway. I got in touch with PC about a replacement arm but not holding out much hope. What a downer on an otherwise amazing figure. Gah.


Sent from my iPad using Tapatalk
That sucks man, hopefully they can sort it out. Push for a complete replacement if you can.

Sent from my ONEPLUS A3000 using Tapatalk
 
Well damn. Got my figure all set up and of course there's an issue. The shoulder joint at the top of the left arm is insanely loose making it impossible to keep the arm lifted even halfway. I got in touch with PC about a replacement arm but not holding out much hope. What a downer on an otherwise amazing figure. Gah.


Sent from my iPad using Tapatalk

I had this exact same issue with my diecast mark 1. I actually fixed it myself (and I know you shouldn't have to). If you're brave enough, the gray colored circular shoulder plates or covers can come off as they are glued on. Take a flat tip screwdriver and pry them off, it may take a little work (not that difficult) to get them off. Once you get them off you'll find that there is a small phillips head screw that hold the shoulder joint together. Take a small phillips head screwdriver and tighten that screw and it will be perfect! Afterwards take a small amount of super glue and glue the covers back on. It's really not that difficult, but I totally understand if you don't want to do that especially if you're not the fix it type. For me it was better than having to go through the difficulty of trying to get a new figure or figure part and all the other hassles that come with the process. Hope this helps, good luck!!
 
Thanks for the tip, I may try that depending on what I hear back. I assumed there is a screw in there somewhere that could be tightened if it could be reached. What side should be taken off, the front of the shoulder or the back? Or both?


Sent from my iPad using Tapatalk
 
Thanks for the tip, I may try that depending on what I hear back. I assumed there is a screw in there somewhere that could be tightened if it could be reached. What side should be taken off, the front of the shoulder or the back? Or both?


Sent from my iPad using Tapatalk

I would take both sides off because you don't really know which direction the screw head is facing (front or back) You may get lucky and only need one side off. I forgot which way mine was. Also, you're very welcomed, always willing to help a fellow collector!
 
Success!
cb484f9506f513a87cc50df81ce4521d.jpg

Dude, you are the freaking man. Thanks for the advice. I actually guessed correctly on the first try and removed the front piece. The whole piece just slightly overlapped the edges of the joint, whereas the back piece sits flush, so I opted to try removing the front piece first since it looked like it would be much easier to get into to pry apart. This is actually really good for everyone to know, I think, in case that joint on anyone else's figures loosens over time. I also didn't even bother gluing it back together, it pegged back in and sits pretty well flush without. Thanks again!
e30c7f53fbc5f477d8ed957d0745e44d.jpg
 
Awesome!! I'm glad this worked out for you. You avoided all the hassle and now you can enjoy your figure!! This is what I love about being on this forum, helping and getting help from others.
 
Picked up an open box but brand new one off fleabay...arriving today, so excited to finally get into the diecast series. Still on waitlist for MK3 though.
 
Success!
cb484f9506f513a87cc50df81ce4521d.jpg

Dude, you are the freaking man. Thanks for the advice. I actually guessed correctly on the first try and removed the front piece. The whole piece just slightly overlapped the edges of the joint, whereas the back piece sits flush, so I opted to try removing the front piece first since it looked like it would be much easier to get into to pry apart. This is actually really good for everyone to know, I think, in case that joint on anyone else's figures loosens over time. I also didn't even bother gluing it back together, it pegged back in and sits pretty well flush without. Thanks again!
e30c7f53fbc5f477d8ed957d0745e44d.jpg


Nice one!! Well done man, very useful intel. :clap
 
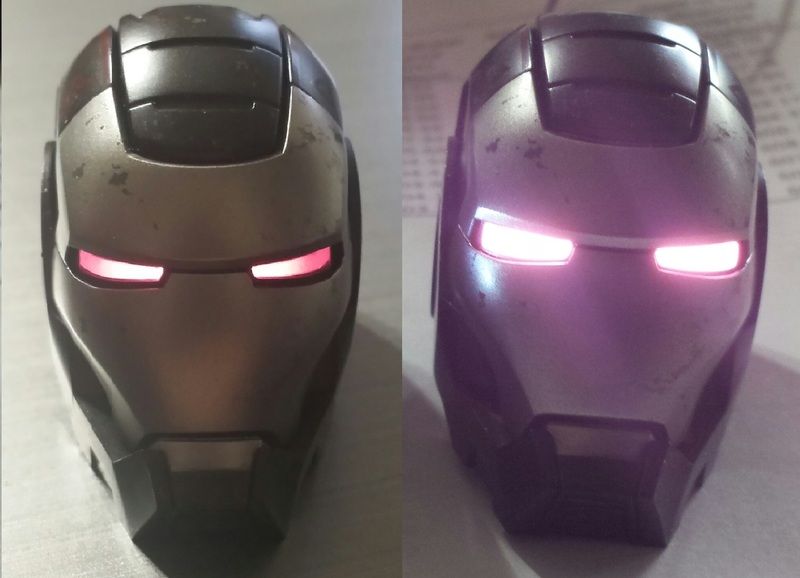
Hey, if one new pink LED looks good, what about....TWO pink LEDs? No more cyclops effect! I wish HT did something like this as stock rather than cheaping out with 1 LED, but I suppose the battery drain would be a problem. Hence, I'm going to change over to USB power - I'll leave a a plug-in spot for the new Mark VI.
20170427_143358-1_zpskqazvgbb.jpg
 
I'm sorry if it's not the place to ask, but is anyone still waiting for their pre-order to ship?
I'm in Canada, pre-ordred from Urban Samurai Hobbies and WM is nowhere to be seen !
 
Hey, if one new pink LED looks good, what about....TWO pink LEDs? No more cyclops effect! I wish HT did something like this as stock rather than cheaping out with 1 LED, but I suppose the battery drain would be a problem. Hence, I'm going to change over to USB power - I'll leave a a plug-in spot for the new Mark VI.
20170427_143358-1_zpskqazvgbb.jpg

Is there options to light up your figures with plug in?


Sent from my iPhone using Tapatalk
 
I'm sorry if it's not the place to ask, but is anyone still waiting for their pre-order to ship?
I'm in Canada, pre-ordred from Urban Samurai Hobbies and WM is nowhere to be seen !

Yeah bud, very late. In Ottawa myself and have had this for several months -- granted I ordered from SS. That being said, I've seen this come and go (a while ago) at my local CBS. So you might want to check in on that.

EDIT:

Welcome to the forum!
 
Hey, if one new pink LED looks good, what about....TWO pink LEDs? No more cyclops effect! I wish HT did something like this as stock rather than cheaping out with 1 LED, but I suppose the battery drain would be a problem. Hence, I'm going to change over to USB power - I'll leave a a plug-in spot for the new Mark VI.
20170427_143358-1_zpskqazvgbb.jpg

You gotta show how you did this. This is one of my peeves when it comes to the IM figures. I wish both eyes had their own light source instead of sharing one in the middle and praying that it's bright enough to fully illuminate both eyes.

Job well done. It looks amazing.
 
Yeah bud, very late. In Ottawa myself and have had this for several months -- granted I ordered from SS. That being said, I've seen this come and go (a while ago) at my local CBS. So you might want to check in on that.

EDIT:

Welcome to the forum!

Go Sens!
 
You gotta show how you did this. This is one of my peeves when it comes to the IM figures. I wish both eyes had their own light source instead of sharing one in the middle and praying that it's bright enough to fully illuminate both eyes.

Job well done. It looks amazing.

There's a trick I've been using for quite some time. Most of the heads use AG1 batteries (LR621) but if you use the slightly larger AG4 (LR626) the lights appear brighter. Both AG1 & AG4 are 1.55 volts so there shouldn't be any issues burning out the LED's. I think the AG4's just pack more powa lol
 
Back
Top