Hot Toys ESB FETT tips tricks and other cool mods

Collector Freaks Forum

Help Support Collector Freaks Forum:

This site may earn a commission from merchant affiliate links, including eBay, Amazon, and others.
Nice work, you?re making some really good progress. I love how the shoulders look, and those braids look amazing!


Nice! Agree, especially in that shot from his left side it looks perfect.
Getting sizing and proportions right on Fett is a hard one, yeah. I always saw him as this lanky guy, but after spending hours studying screenshots, I find his shoulders are quite broad. But then depending on the angle (and probably camera & lens used), his helmet either looks in proportion of quite oversized.


I'm making slow and steady process on my Fett as well. Changed up the upper body and upper arms again, resewed the upper arm sleeves and ankles some more, made some new wookie braids, and did some other small things here and there.
I still need to redye the belt pockets, and do the rifle, gauntlets, & hands, and repaint the armor. My Archive X acrylics shipped, so I can start on the gauntlets soon.

View attachment 510693


Sent from my iPhone using Tapatalk
 
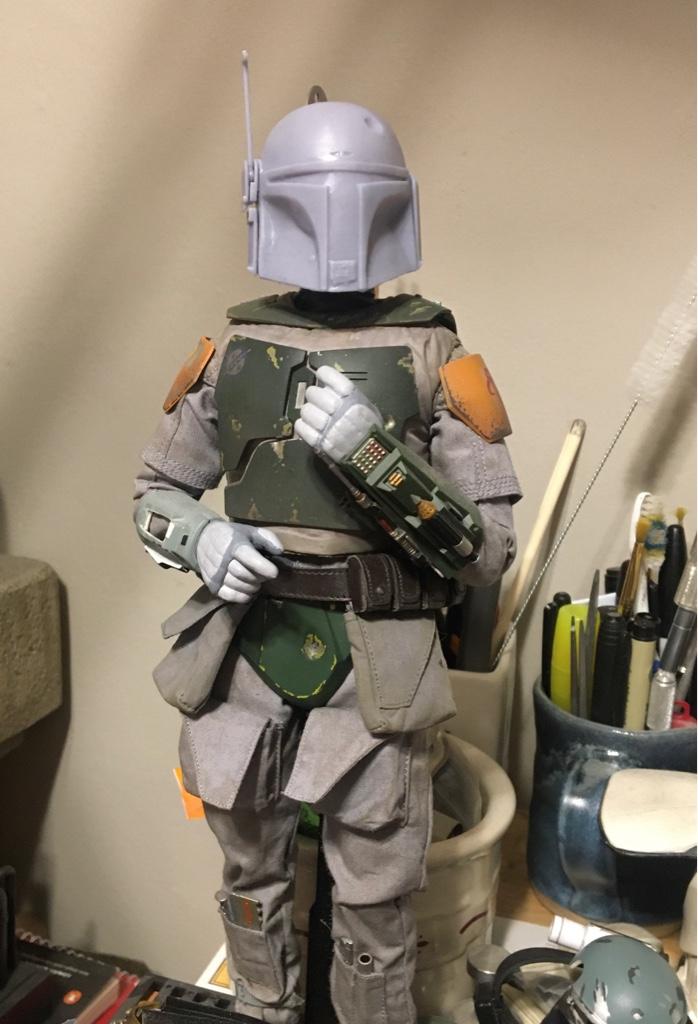
I realized after staring at it for a while that the issue with the helmet looking oversized was simply the fact that it was too low on the head, so I stuck a bottle cap in there and voila, it looks much better. I also took the picture from further back to eliminate any lens distortion.

4486373d41671c0d3f7ab0b7695bc184.jpg

e5cad1948a4b0b47f84b477dd000aff5.jpg

11392d8e978bf2eaa97a492b7a694ea3.jpg


Sent from my iPhone using Tapatalk
 
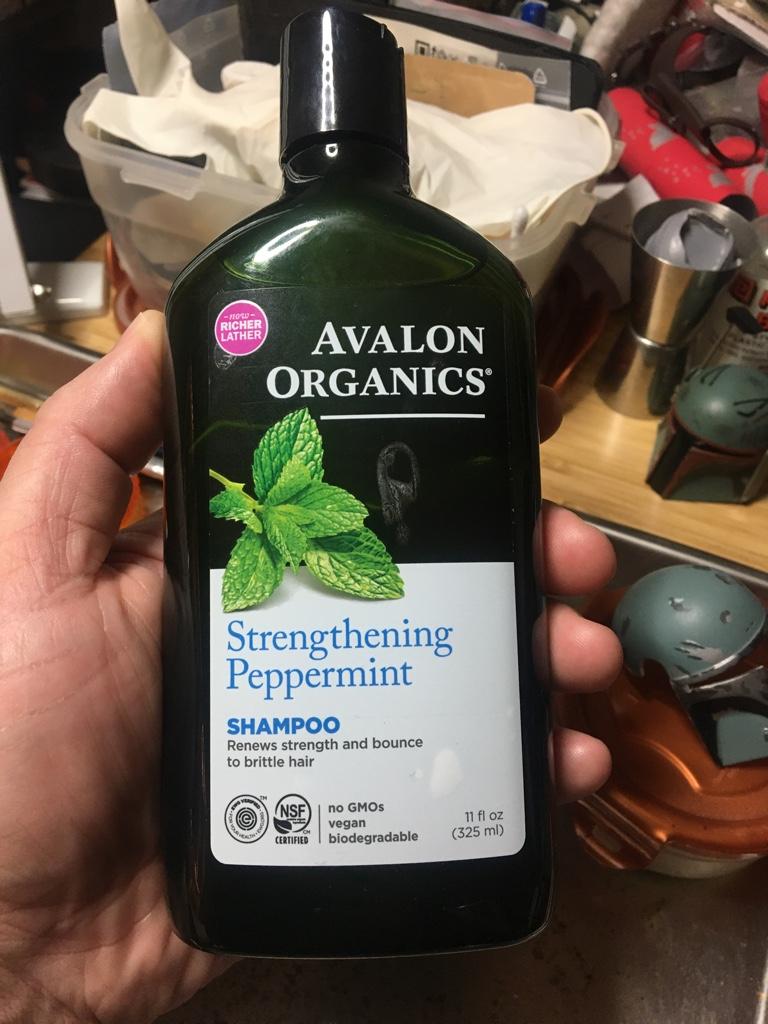
Found a bottle of shampoo thats the same smoky green that Fetts visor is. And the sides of the bottle are almost perfectly curved to fit into the inside of the helmet.

ill just need to do a hot water/cold water treatment to shape it perfectly, and then maybe some Future to get it glossy.

Heres some pics.

7042ce8aec1dbae3b0c8c888947c4146.jpg

3ed2ad92b0fdc35f55ec9c02c4eb891e.jpg

54ef1a72e339207af7b9e6bf8b4574db.jpg


Sent from my iPhone using Tapatalk
 
Nice find, WTC.

Now that I have the Archive X colours, I'm picking up work on the gauntlets again. Something I can't figure out is what to use for the 4 darts on the right gauntlet. The HT darts are oversized and won't fit on the medicom gauntlet, which is what I'm using as a base.
I'm starting to think that perhaps I should use the tips of sewing needles, though they would lack the detail of the real darts. Perhaps I'm trying to aim for something that's not viable at this scale? Would love to get some input on this.

This is the reference I put together from movie/costume shots and the 501st reference.
Boba Fett Gauntlet right.jpg
 
Im having the same issue with the darts. The last resort for me in these situations is to get John at Fullmetal Customs to make for me what I can?t make myself. They will be actual metal, they will look perfect, and they will be $$$expensive$$$.

Ive also noticed that in some reference images the darts appear all silver, and in others, two of them are painted black on the tips. Ive also seen some folks paint a couple of the dart tips red. The metal switches on the top/side of the gauntlet look like they have black tips in some reference images, but appear all silver in other images.

Heres what the shampoo bottle looks like if anyone wants to go that route for the smoky green visor.

c313f69ea03a7276f97214f43de60296.jpg


Sent from my iPhone using Tapatalk
 
Just got my 40th Fett in. Looking forward to modding him a bit.
 
Last edited:
Nice! Agree, especially in that shot from his left side it looks perfect.
Getting sizing and proportions right on Fett is a hard one, yeah. I always saw him as this lanky guy, but after spending hours studying screenshots, I find his shoulders are quite broad. But then depending on the angle (and probably camera & lens used), his helmet either looks in proportion of quite oversized.


I'm making slow and steady process on my Fett as well. Changed up the upper body and upper arms again, resewed the upper arm sleeves and ankles some more, made some new wookie braids, and did some other small things here and there.
I still need to redye the belt pockets, and do the rifle, gauntlets, & hands, and repaint the armor. My Archive X acrylics shipped, so I can start on the gauntlets soon.

View attachment 510693

Which upper body/arms did you swap in?
 
I'm new at Hot Toys collecting but I've been enjoying reading about everyone's work with this figure. I wish I was that handy!

I recently got this Boba Fett and was wondering if there's any way to build a second Boba out of the extra parts in the deluxe set? I know about Phicen bodies, but is there a kit out there that would have a suit and boots for it? My goal is not so much to have specifically a prototype BF but just to make use of the extra pieces. Thanks!
 
Which upper body/arms did you swap in?
Sorry for the late reply. I undressed Fett today again, so I took the opportunity to take a shot of the body.
I'm using an old Hot Toys Truetype (circa 2007) upper chest, a spare neck I had in my parts bin (wider and longer) - the rest of the body is the original Fett body. I did shorten the lower legs as well. For padding, I only kept the diaper part of the undersuit, and padded the neck to get it as thick as possible.

Also attached a WIP shot of the left gauntlet, hoping to finish that soon.
 

Attachments

  • IMG_5832_2_small.jpg
    IMG_5832_2_small.jpg
    442.5 KB
  • IMG_5829_2_small.jpg
    IMG_5829_2_small.jpg
    379.6 KB
Sorry for the late reply. I undressed Fett today again, so I took the opportunity to take a shot of the body.
I'm using an old Hot Toys Truetype (circa 2007) upper chest, a spare neck I had in my parts bin (wider and longer) - the rest of the body is the original Fett body. I did shorten the lower legs as well. For padding, I only kept the diaper part of the undersuit, and padded the neck to get it as thick as possible.

Also attached a WIP shot of the left gauntlet, hoping to finish that soon.
Looking good! That padded neck should do wonders. Looking forward to the finished figure.
 
I posted this in the regular thread, hopefully I’ll have better luck here. :lol

I recently acquired this figure and I noticed his chest armor is slightly crooked. Has anyone had any luck taking the pieces off and realigning them? P&TY
 
Looking good! That padded neck should do wonders. Looking forward to the finished figure.
Thanks! Yeah the original neck is too thin and short. I'd prefer to have it even a bit thicker, but there's no more give in the fabric.
I posted this in the regular thread, hopefully I’ll have better luck here. :lol

I recently acquired this figure and I noticed his chest armor is slightly crooked. Has anyone had any luck taking the pieces off and realigning them? P&TY
I haven't removed them yet, though I'm planning on doing it in order to repaint the armor a more accurate shade of green.
I haven't fully figured out how to do it yet though. I'll probably install magnets after removing them.
The pieces are attached at specific spots with pins through holes in the vest. You might be able to remove the piece in question and reattach it with some milliput on the inside of the vest at the end of the pins.
 
I made more progress on Fett. The jumpsuit and pouches are now completely finished. I re-tailored, dyed and weathered them. I think I'm done with the underlying body as well, though I'll see once all the parts are done and I do the final fitting.
I also painted the knee pads and the right shoulder guard. They vary so much between yellow and orange on-screen depending on the lighting, so I went with something in between that I liked and matched the reference I liked most.
I started the base green on the armor (groin, chest and back) as well, hoping to make some good progress on that.

IMG_5844_2_small.jpg
IMG_5854_2_small.jpg
 
Thanks! Yeah the original neck is too thin and short. I'd prefer to have it even a bit thicker, but there's no more give in the fabric.

I haven't removed them yet, though I'm planning on doing it in order to repaint the armor a more accurate shade of green.
I haven't fully figured out how to do it yet though. I'll probably install magnets after removing them.
The pieces are attached at specific spots with pins through holes in the vest. You might be able to remove the piece in question and reattach it with some milliput on the inside of the vest at the end of the pins.
Gracias amigo!
 
Making more progress on the armor. Only one more panel and the diamond left to do. Really happy with the progress so far.
I still have to figure out how to do the round chest emblem, the decal I got from ebay is too large unfortunately. Now looking into circle masking stickers so I can paint it myself. I should be able to do the wheat looking thing, tear drop and 7 by hand, but the circle needs by perfectly circular.

IMG_5906_small.jpg
 
@agonistes86 the logo on the actual armor was hand painted if that helps you at all.
Thanks. That's exactly the route I ended up taking!
I got circular masking tape, a 5/0 brush, magnifying lenses and spent about 5-6 hours painting it. I'm quite happy with the result. 😀
The project is on hold for the time being while I'm renovating the house, but the only thing left for the armor is the digital display on his left chest, which I want to paint with a glowing effect.

received_426979095145509.jpeg
 
Back
Top