Tamashii Soul of Chogokin C-3PO & R2-D2

Collector Freaks Forum

Help Support Collector Freaks Forum:

This site may earn a commission from merchant affiliate links, including eBay, Amazon, and others.
You sent it Wednesday, right? It's only a couple states over.

BTW, thanks for stuffing the tutorial in there too. I was stoked that I didn't have to find the post. Just grabbed scissors and my small screwdriver and was done in five minutes. :)

"My small screwdriver".... I'm sure there's a joke there. :lol
 
so, I went to LCS this morning to resolve the both-left-palm-hand problem...
I already made appointment with the owner, but when I got there, he was nowhere to find, so I waited. and while I did stroll around at the display case, there it was, c-3po display with right hand I looked for.
so I convinced the store worker, rather than replace with a new C-3PO, it's better to just let me swap the hand the c-3PO at the store-display.
thank god the worker gave me green light, so now I have c-3PO with no defect problem :D
 
A little advice would be great please. I just picked this guy up from the post office, there are very minor marks over the body (so much so I cant take a photo) but most noticeable there are several tiny imperfections on 3p0's forehead. The seller has said he will replace the head "if he must". Im just not sure if Im being over the top, and the next head will have the imperfections also. The seller is in Japan, so the cost would be reasonable to return the head from the UK.

On really close inspection does anybody else have these issues they have just ignored or not even noticed? I know is is hard to get a perfect shiny finish on something that shows up every mark. If this was a std ss fig I would have no issue just at £260 this is well "high end"!!!.
Thanks
 
... there are very minor marks over the body (so much so I cant take a photo) ...

An iPhone or similar camera pic, taken in good light, should reveal even the slightest surface blemishes. If the blemishes can't be seen in a pic, then honestly, they probably aren't there to 9/10 pairs of eyes. Are you sure it's not just tiny flecks of dust sticking to the oil coat?

Can you take a pic of the head? One collector's "meh" is another collector's "Faaaaaaaaaark!!!!".
 
? One collector's "meh" is another collector's "Faaaaaaaaaark!!!!".

I know what you mean, Outside the cabinet I cannot see it, I have to have him in hand to notice it. Will have another try with a photo. Anywhere else Im not too bothered, its just on his lovely golden top!!!
 
so, I went to LCS this morning to resolve the both-left-palm-hand problem...
I already made appointment with the owner, but when I got there, he was nowhere to find, so I waited. and while I did stroll around at the display case, there it was, c-3po display with right hand I looked for.
so I convinced the store worker, rather than replace with a new C-3PO, it's better to just let me swap the hand the c-3PO at the store-display.
thank god the worker gave me green light, so now I have c-3PO with no defect problem :D

That was awesome!
Hope he still has a job though. :)
 
Couple of questions for those who have fixed the eyes. What color gel is used for the mod? And how complicated is it to insert the gels?

Thanks for any help.
 
Couple of questions for those who have fixed the eyes. What color gel is used for the mod? And how complicated is it to insert the gels?

Thanks for any help.
I picked up a GamColor swatch book from a local lighting supply store, hacked up several colors and sent them out to a bunch of fellow Freaks here a few months back. While quite a few different colors produced results that looked close to how Threepio's eyes looked in the movies, I found that a dark orange-brown looked best to not only produce a nice amber hue, but it toned down the excessive brightness from the tiny LEDs inside the figure's head.

Here are some diagrams I made describing the process:

assemble-1_zps4968acab.jpg


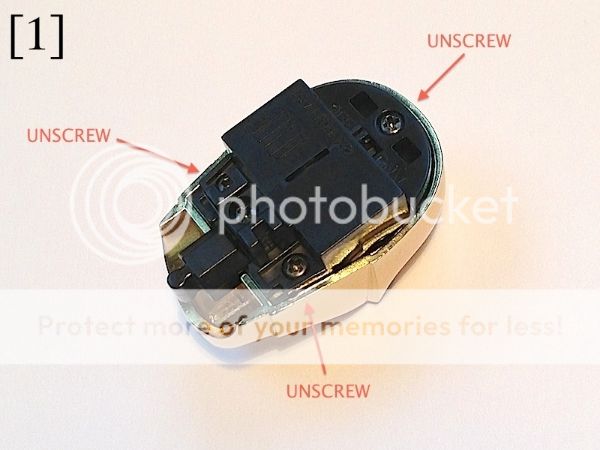
First, unscrew the top, bottom-left and bottom-right screws to undo the lighting assembly. The bottom-center is for the battery compartment, so it can be left on. Then, carefully lift the whole thing out.

assemble-2_zpsf2a98c81.jpg


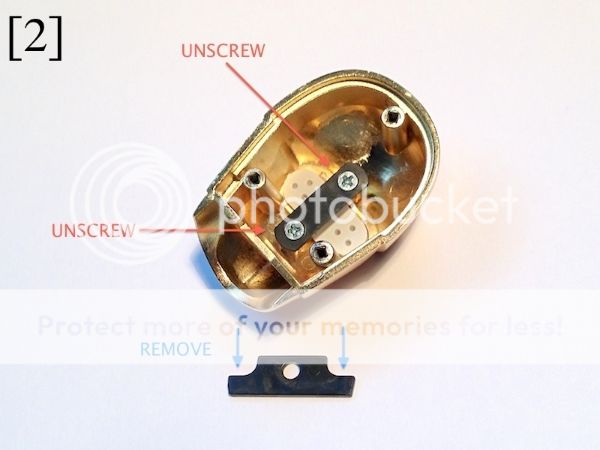
Next, remove the small black piece at the bottom and undo the silver screws holding the black plastic vertical bar holding the eye pieces in place.

assemble-3_zpsab301d00.jpg


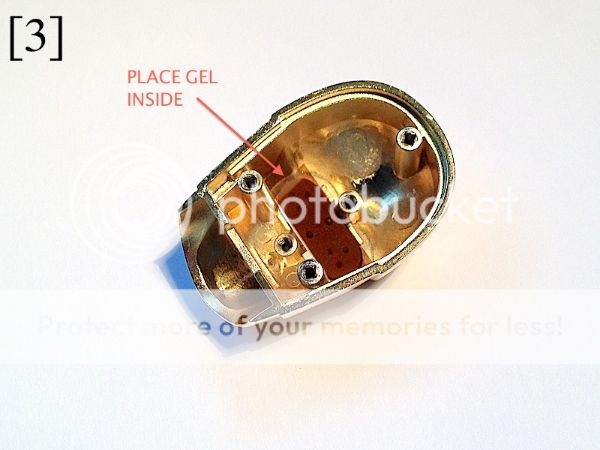
Finally, cut the gel into a narrow, slightly trapezoidal shape and place it right over the back of the white translucent eye piece, longer horizontal side on top. Put everything back together, making sure not to replace the screws so tightly that the gel warps.

Eyes08_zps59cf5f68.jpg


Once the figure is reassembled, it should look something like this. Easy-peasy!
 
You sent it Wednesday, right? It's only a couple states over.

BTW, thanks for stuffing the tutorial in there too. I was stoked that I didn't have to find the post. Just grabbed scissors and my small screwdriver and was done in five minutes. :)

"My small screwdriver".... I'm sure there's a joke there. :lol

Couple of questions for those who have fixed the eyes. What color gel is used for the mod? And how complicated is it to insert the gels?

Thanks for any help.
Anyone by chance have a little bit of the color gel swatch they can spare for this mod to help me out with this little mod for my 3PO? Just thought I'd try to ask before just trying to order a whole sample book for myself as I'll only be needing a small piece it seems for the mod! If anyone can help, please PM me! Thanks, guys! :wave
 
I'd love to modify the eyes, but I'm too scared I'll end up breaking the thing, so I'll leave it for now. Kudo's for all you folks who are able to do mods on your figures (sideshow could learn a few things from you guys)
 
I'd love to modify the eyes, but I'm too scared I'll end up breaking the thing, so I'll leave it for now. Kudo's for all you folks who are able to do mods on your figures (sideshow could learn a few things from you guys)

Unless you use a hammer instead of a screw driver, there is just about zero chance of stuffing this up. PJB's tutorial is spot on - your biggest risk is losing a screw :)
 
Back
Top