Attn: Custom Artists!! Newbs, ask Questions here!

Collector Freaks Forum

Help Support Collector Freaks Forum:

This site may earn a commission from merchant affiliate links, including eBay, Amazon, and others.
Thanks chaps. I think I'll go ahead and buy these bags and give it a go.

Regarding the dyeing, how easy (or not) would it be to dye Sarah Connor's green vest white?

Couldn't you bleach the vest to make it white? From what I understand the longer it sits in the bleach the whiter it will get until all the color is gone. Just remember it will not change color instantly. Let it dry over night and it should be white by morning. I would also suggest testing this on something less important first to gauge how much time it will need to be in the bleach. Rise it out then let dry over night. That is, unless someone else has another recommendation.
 
I've never had any trouble using RIT color remover and it usually safer to use on synthetic materials than bleach which can make synthetics melt. I found that out the hard way a few years ago!

However, you can use bleach, but you just need to be a bit more careful than I was. Make sure the bleach is diluted with warm water and make sure you don't leave the item in the bleach bath for too long. It is much better to do multiple applications than to do one long one. So for instance, leave it in for 30 seconds then rinse it out thoroughly in warm water and see what the color is, leave it in for another 30 seconds, etc. If the color is going to come out at all (and with some synthetic material almost nothing will come out no matter what you do), you should start to see changes almost right away. If you are trying to get to white from green it should be pretty easy to tell when all the color is out.
 
I've noticed the neck on my Hot Toys Iron Man Mark III has started to fade. I'm thinking of doing a repaint of the figure to fix the fading, and to get the red a more accurate color. I've never done a repaint, though, so I'm not sure where to begin. Does anyone have recommendations for paint or brushes to use to get a consistent metallic red look? Also is there way to disassemble this figure to make it easier to paint without running the risk of damaging it?

Clean the part and slightly coat it with "Clear Red" through airbrush and coat him with clear coat for durability. Lacquer paint recommended!
 
I have a question for painting my Robocop vinyl helmet. I saw the paint job from Fred Barton. I like the paint job very much. But i am not good at mixing some collors to make one collor. This is the kit i have:

robo1.jpg


And this collor i like;

attachment.php


Please help me with a nice collor :pray: Thanks a lot :clap
 
Hey everyone... Been doing 6" scale customs for about 15 years now, but only recently signed up here on the forums. Some amazing customs on this site!

Anyway, I had a question. Normally when I'm molding and casting, I use Smooth-On's Smooth-Cast liquid plastic to make my parts.

I want to branch into some flexible parts that can be either tinted or painted. Essentially, I want to cast a Michael Keaton Batman belt as a flat shape, and then be able to wrap it around a 6" scale custom.

Any suggestions on a good flexible material I could use to cast this in? And, would I need to tint it gold to begin with, or could it be painted after the fact?

Any pointers would be *greatly* appreciated. Thanks!

Matt
aka Iron-Cow
 
i don't know if anyone can help but i want to add height to a hot toys t-800 but it needs to have bare feet also does anyone know how i could cover up the pegs connecting the feet to the ankles?

any help would be much appreciated.
 
Hey Everyone,
Was just wondering if anyone could help me out with what colors I should be using in order to get a good realistic skin tone. I'm getting either too light or too dark and if I knew exactly what colors to be mixing that would help me greatly.
 
Hey Everyone,
Was just wondering if anyone could help me out with what colors I should be using in order to get a good realistic skin tone. I'm getting either too light or too dark and if I knew exactly what colors to be mixing that would help me greatly.

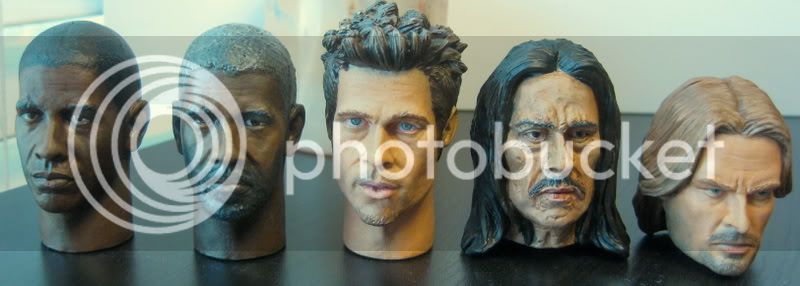
The colors I mix are: titanium white, burnt sienna, raw sienna, burnt umber and a touch of blue and a touch of carbon black. With those I painted all of these heads -- with different ratios, of course. For Caucasian flesh it's basically a little black with the white to make an off-white -- not gray, off-white. Separately I mix, like, 60% burnt sienna with 40% raw sienna. I mix the off-white and the sienna mix to get a nice color and then add a touch of blue and/or burnt umber to taste. Then it's all a matter of adding off-white or the sienna mix until it's what I'm aiming for. Hope this helps.


3d029602.jpg
 
Heya ,
Been collecting Hot Toys for a while now and just got into the world of customs

Does anyone have useful links on painting and hair rooting?
Thanks!
 
hey guys!

Does anyone have advice on techniques for painting the joints of legs and arms, on a 1/6 scale HT Predator?

I allready made sure there is enuff space between all moving parts, so that a thin layer of paint should hold and not get scraped away.

Friendly regards,

PredFreak.
 
Hey everyone... Been doing 6" scale customs for about 15 years now, but only recently signed up here on the forums. Some amazing customs on this site!

Anyway, I had a question. Normally when I'm molding and casting, I use Smooth-On's Smooth-Cast liquid plastic to make my parts.

I want to branch into some flexible parts that can be either tinted or painted. Essentially, I want to cast a Michael Keaton Batman belt as a flat shape, and then be able to wrap it around a 6" scale custom.

Any suggestions on a good flexible material I could use to cast this in? And, would I need to tint it gold to begin with, or could it be painted after the fact?

Any pointers would be *greatly* appreciated. Thanks!

Matt
aka Iron-Cow

Ask the guys at Reynolds Advanced Materials, they carry Smooth on products and can recommend what you need. The Dragon Skin silicone may be what your looking for, it can be painted with their special silicone paints.
 
Hi all, I hope this is the right place to post this question...


I want to cut a chunk out of a head sculpt to customize it. Once I remove the chunk I want to place sculpy there to sculpt a new mouth for example...

How do I bake the sculpy to cure it - while it's on the head sculpt? Surely I cannot put a head sculpt like a Hot toys one in the oven at 130 degrees? Am I suppose to carefully remove and attach it back to the head sculpt? Seems like a really good way to mess up what you've done (having to remove it to bake it and put it back)... Can anyone clairify this for me?
 
^^^ see if you can find a heatgun or even a hair dryer will do the trick, although I have put some HT heads in the over at 210-ish only for about 5-7 minutes and watched it carefully.

Also trying increments at a time in the oven works.
 
sixth_sith: In this case, I'd personally avoid using anything heat-related on the headsculpt. You just don't want to risk it (believe me, I had an entire Batmobile melt on me when I left it a bit too long in the oven).

Have you ever tried Magic Sculpt? It's a 2-part epoxy compound that I use all the time for my own customs. No heating required.. it cures on its own and can be sanded/polished to achieve that "manufactured" look pretty easily.

https://www.magicsculp.com/

Hope this helps!

Hey man! good to see you here!!!. I don't think you'll remember me, but I was a member on Tim's coolcollecting.com and other 5" customizing forums. I even joined one of those custom cons. I went by Psycho_JOhnny, anyways, hope you stick around dude!, always loved your customs. :peace:peace:hi5:
 
Hi all, I hope this is the right place to post this question...


I want to cut a chunk out of a head sculpt to customize it. Once I remove the chunk I want to place sculpy there to sculpt a new mouth for example...

How do I bake the sculpy to cure it - while it's on the head sculpt? Surely I cannot put a head sculpt like a Hot toys one in the oven at 130 degrees? Am I suppose to carefully remove and attach it back to the head sculpt? Seems like a really good way to mess up what you've done (having to remove it to bake it and put it back)... Can anyone clairify this for me?


^^^ see if you can find a heatgun or even a hair dryer will do the trick, although I have put some HT heads in the over at 210-ish only for about 5-7 minutes and watched it carefully.

Also trying increments at a time in the oven works.

You can also boil Sculpy to cure it. That's normally what I do. I just boil a pot of water and hold whatever it is either with tongs or in a slotted spoon so it doesn't just fall to the bottom the pot. About 3-5 mins normally does the trick!
 
What is the best paint sealer for sealing a painted head?

I just finished my first paint job and the matt varnish sealer I bought is still a little tacky feeling a day later. Will it hurt the paint if I use another coat of sealer over the other sealer if it is still tacky feeling or will it seal it up and dry normally?

It could possibly save it, it all depends, try Testors dullcote.
 
Back
Top