You are using an out of date browser. It may not display this or other websites correctly.
You should upgrade or use an alternative browser.
You should upgrade or use an alternative browser.
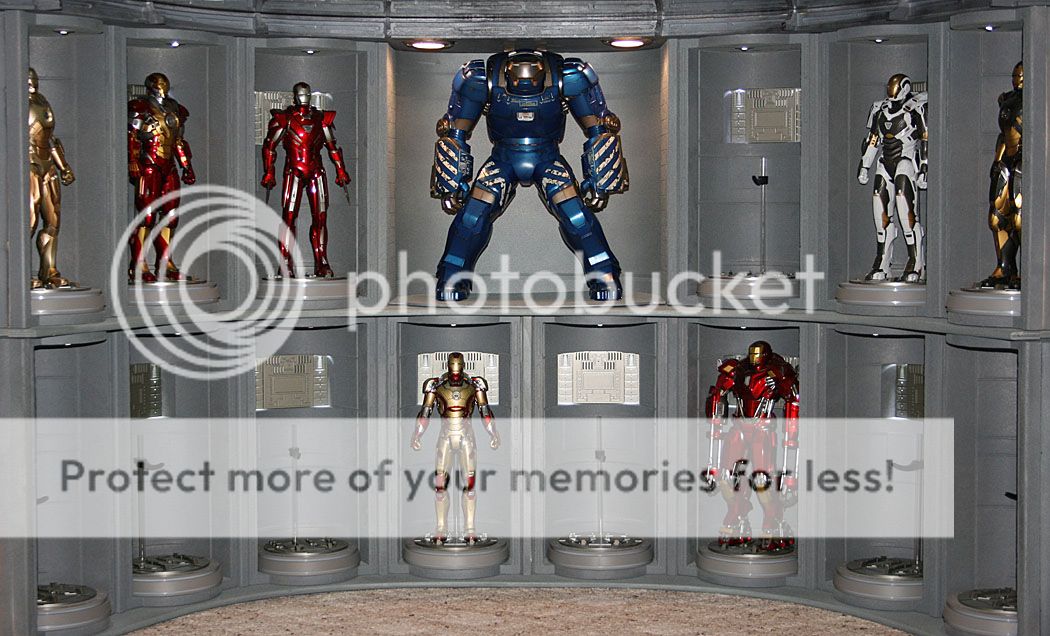
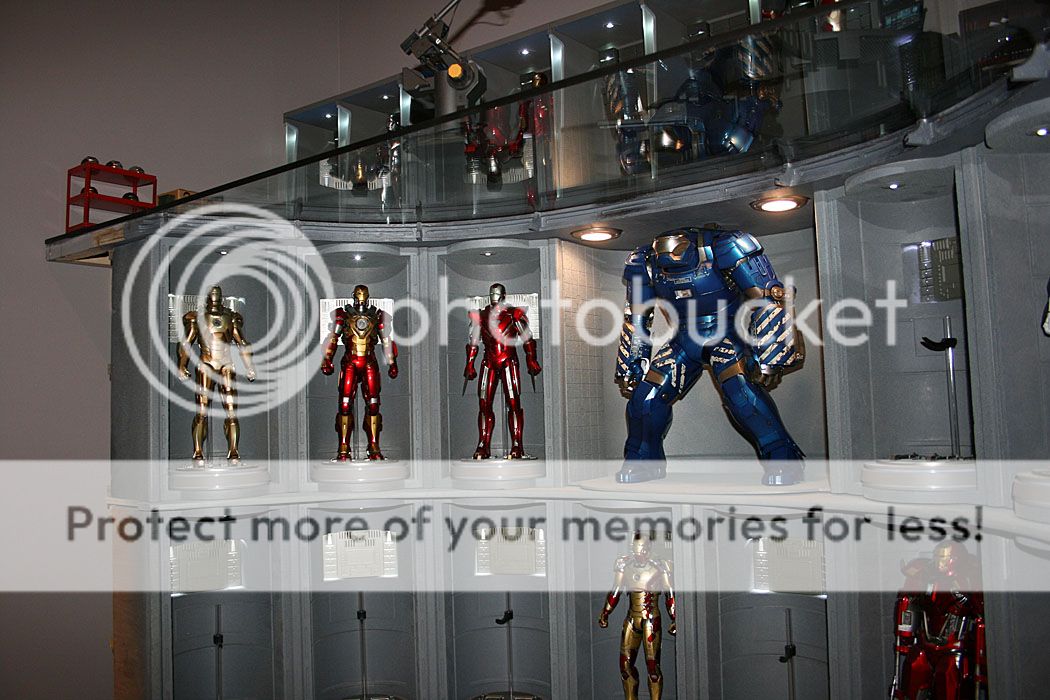
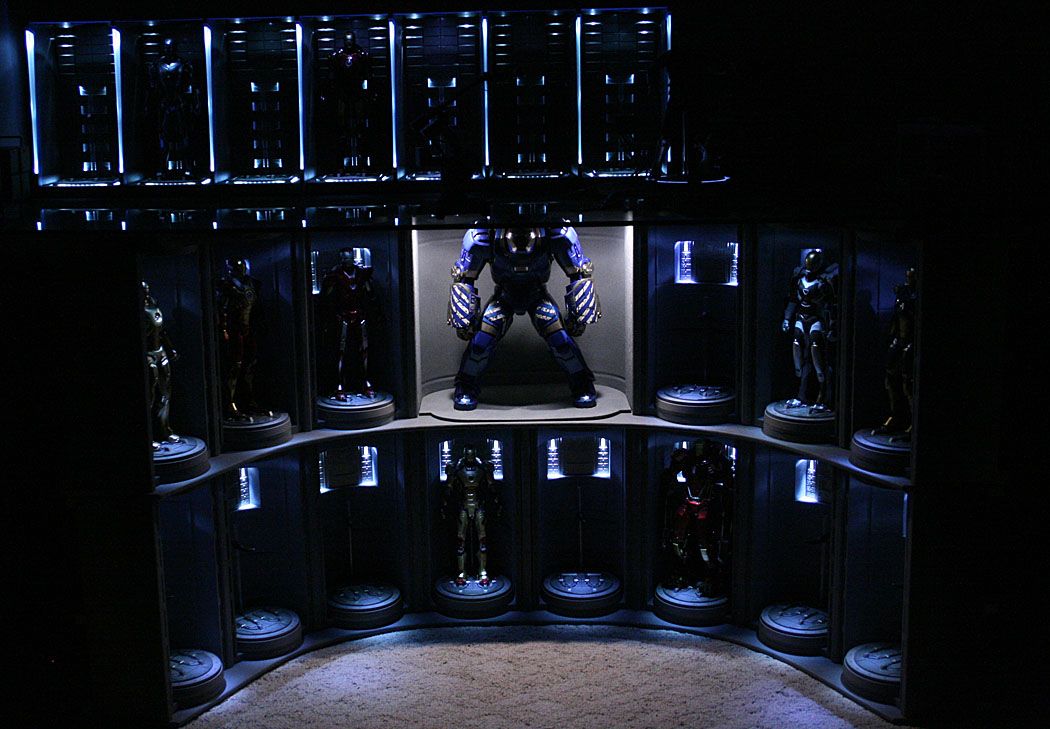
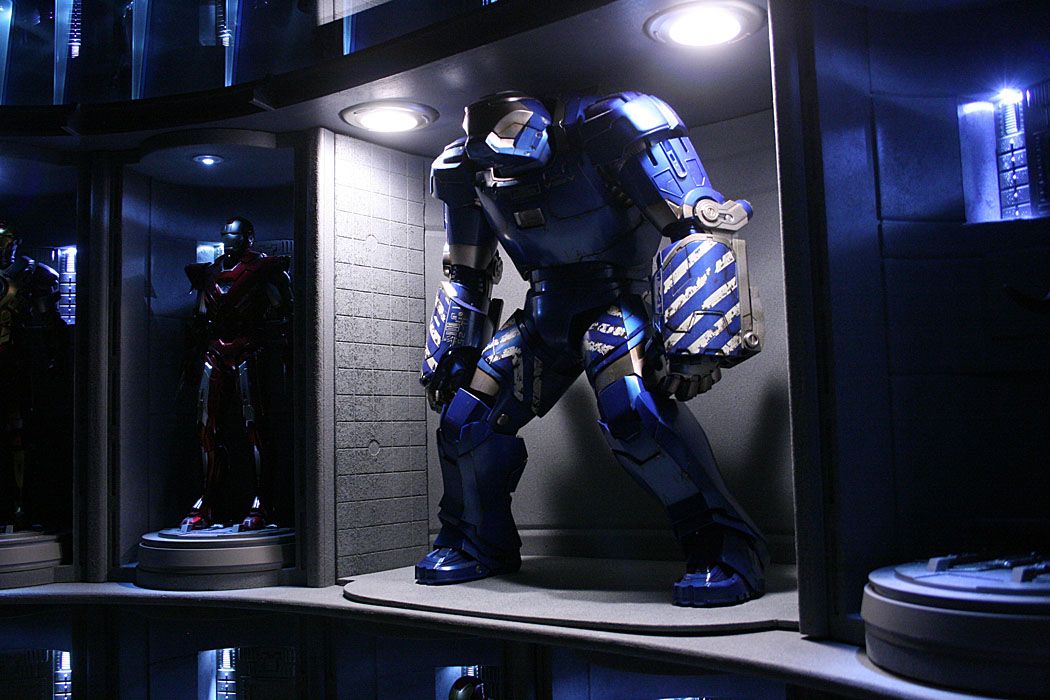
1/6 Hot Toys Custom Hall of Armor Projects / Display Base Mods
- Thread starter Boba Debt
- Start date


Help Support Collector Freaks Forum:
This site may earn a commission from merchant affiliate
links, including eBay, Amazon, and others.
San
Just a little freaky
Here's my choice for lighting up the HOA walls:
[video]https://kyohime57.free.fr/San/hall_of_armor.mp4[/video]
[video]https://kyohime57.free.fr/San/hall_of_armor.mp4[/video]
Brainiac
Super Freak
Here's my choice for lighting up the HOA walls:
[video]https://kyohime57.free.fr/San/hall_of_armor.mp4[/video]
Holy crap thats cool

 and upside down
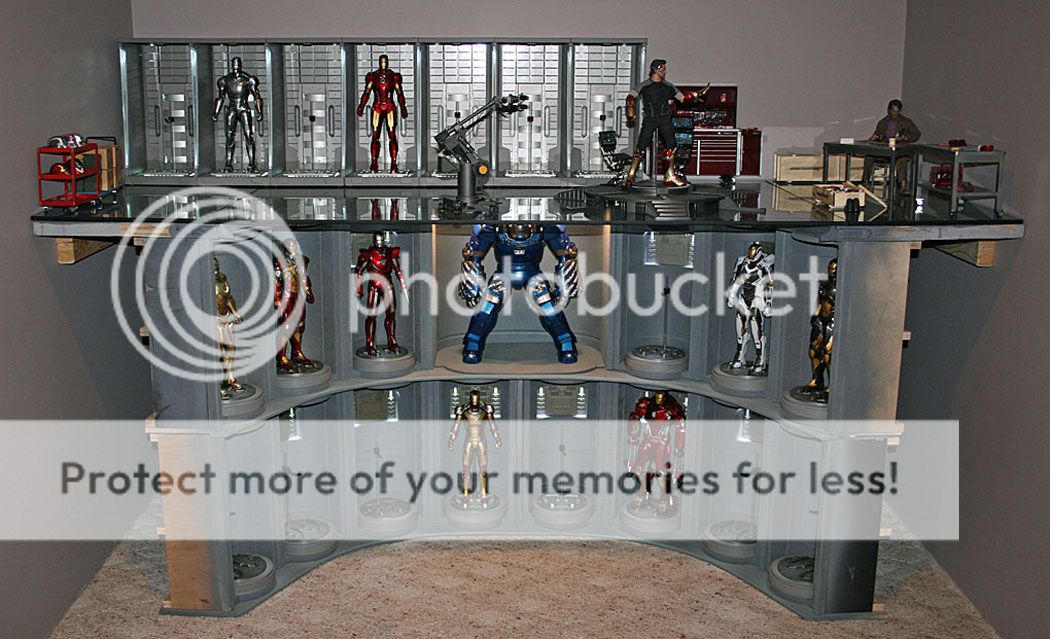
 I got a lot done since my last update
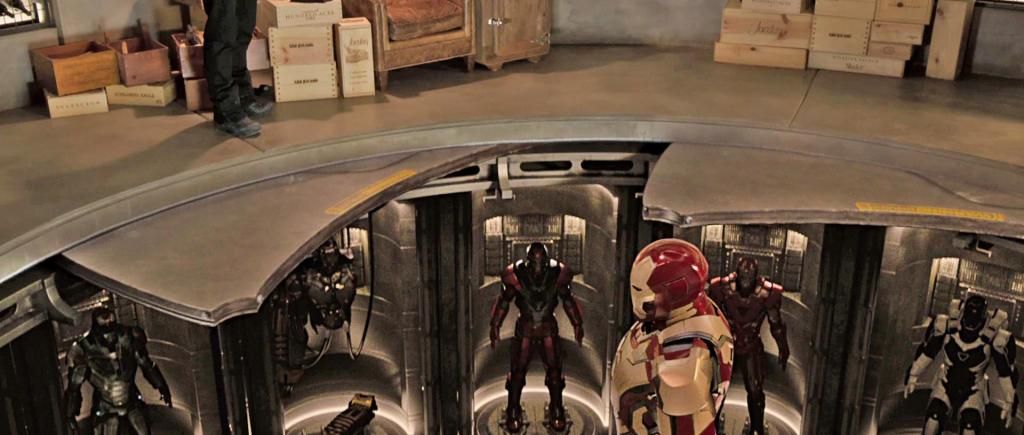
The closet/room that this will reside in, is almost complete but it was far enough along to start setting up the Marvel side
I have installed the Wine Cellar and the Work Shop Level, but still have to build the 2 upper levels and the cabinets that will go on the left and right side in front of the Wine Cellar.
The left side will display Mandarin and Whiplash and the right is reserved for Hulk Buster
This is all wired up to turn on and off with my smart phone via my SmartHome system. I tried to do a video but it just didn’t look right.


CupcakeMcGraw
Super Freak
- Joined
- Apr 13, 2015
- Messages
- 1,112
- Reaction score
- 220
Looks like you have to sit on the floor to enjoy your figures.
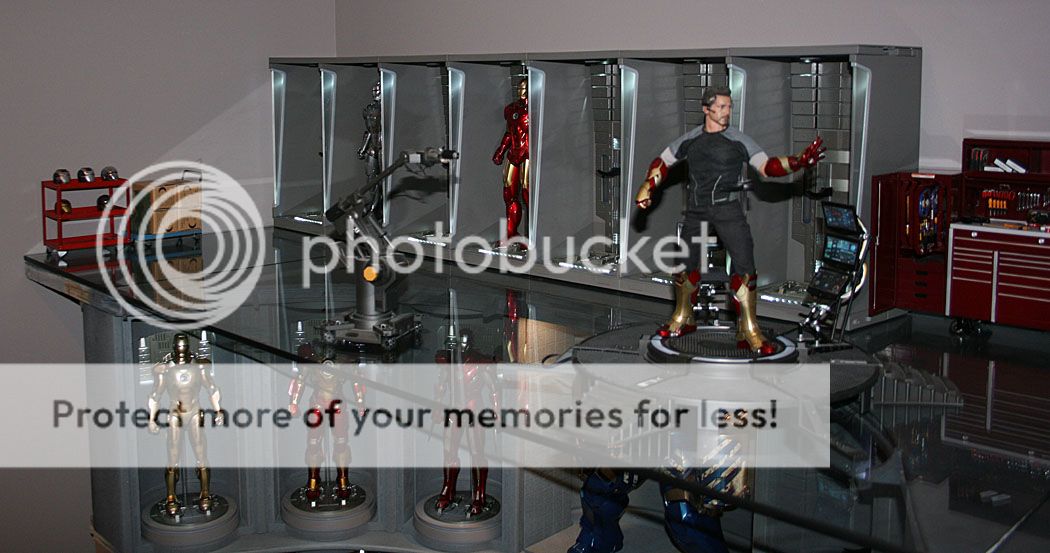
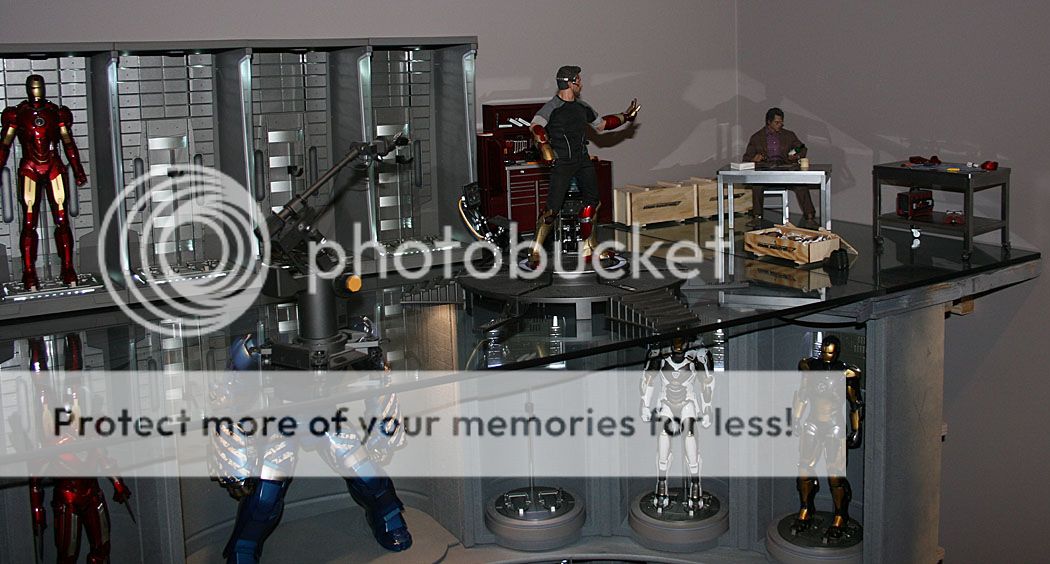
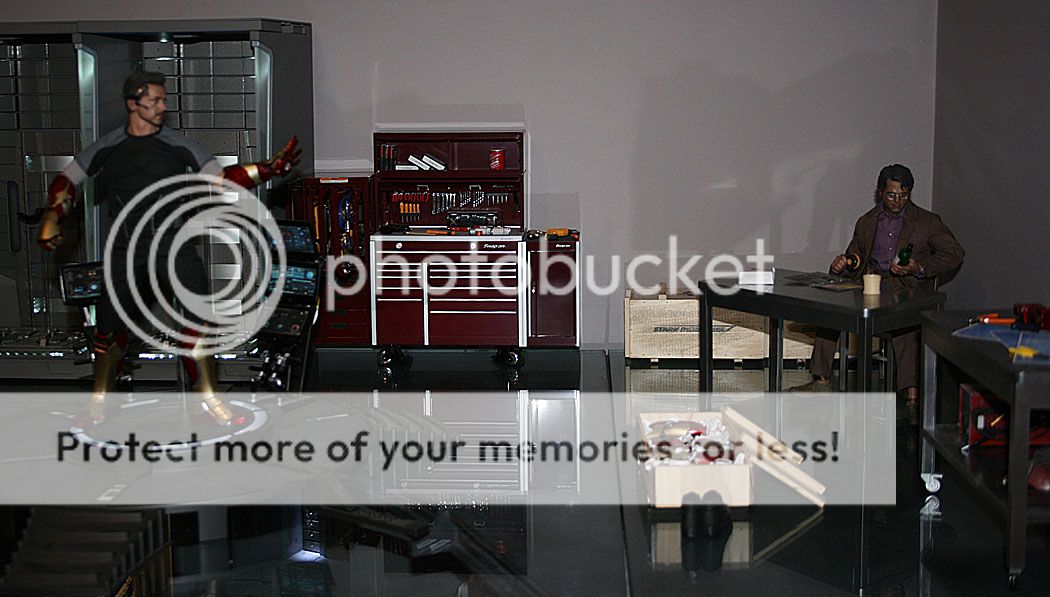
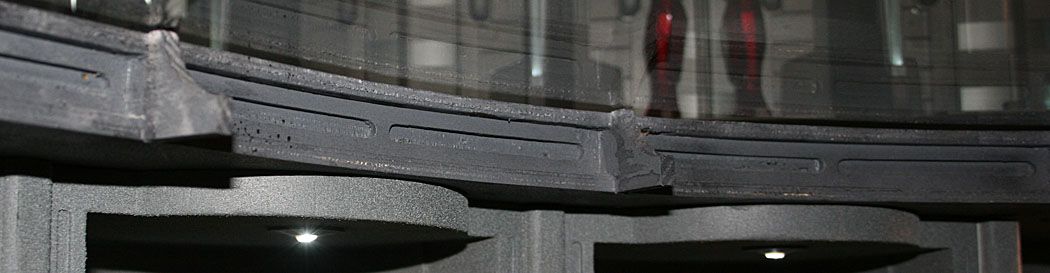
Some close ups of the details
I wanted to replicate the look of the detail above the Wine Cellar Bays but the more I studied this picture the less I understood it, they don’t seem to line up with anything
So this is what I came up with:
My wife loves the way I set up Bruce here

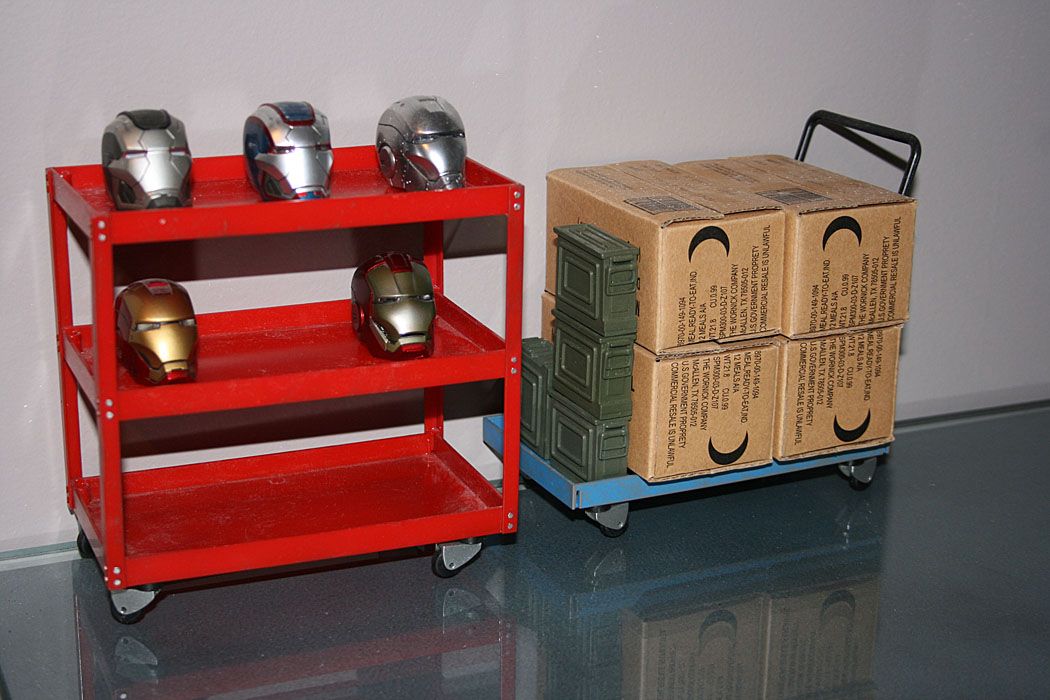
This is a Snap On Bank, it’s about 1/10 scale but looks good in the back ground

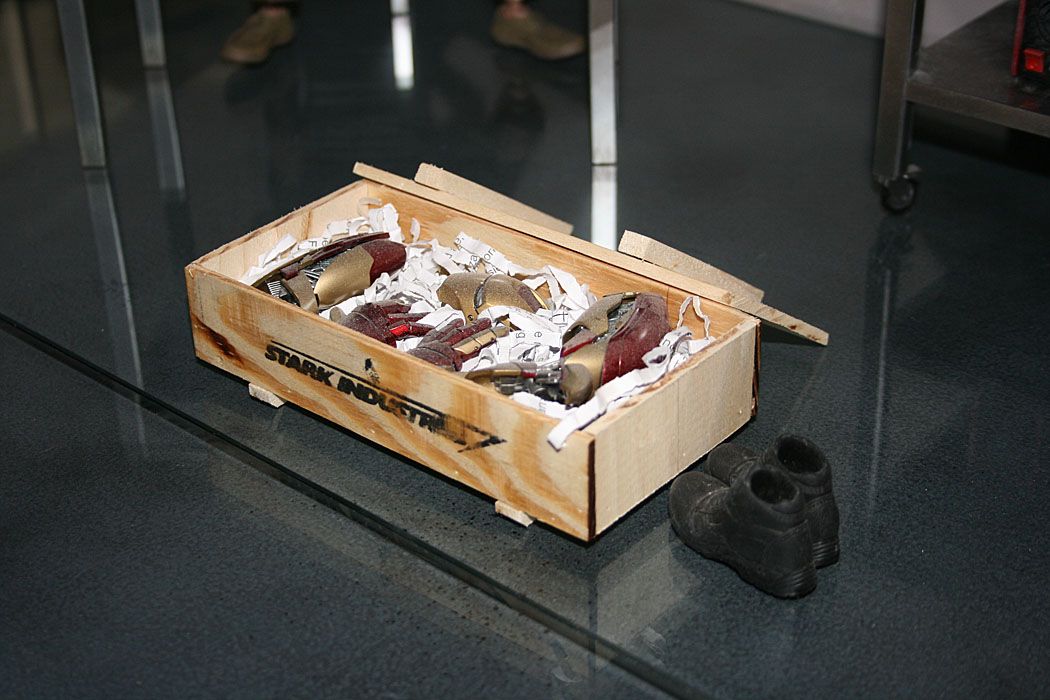
This is a little wood crate I made, you can see 2 larger crates in the other pictures
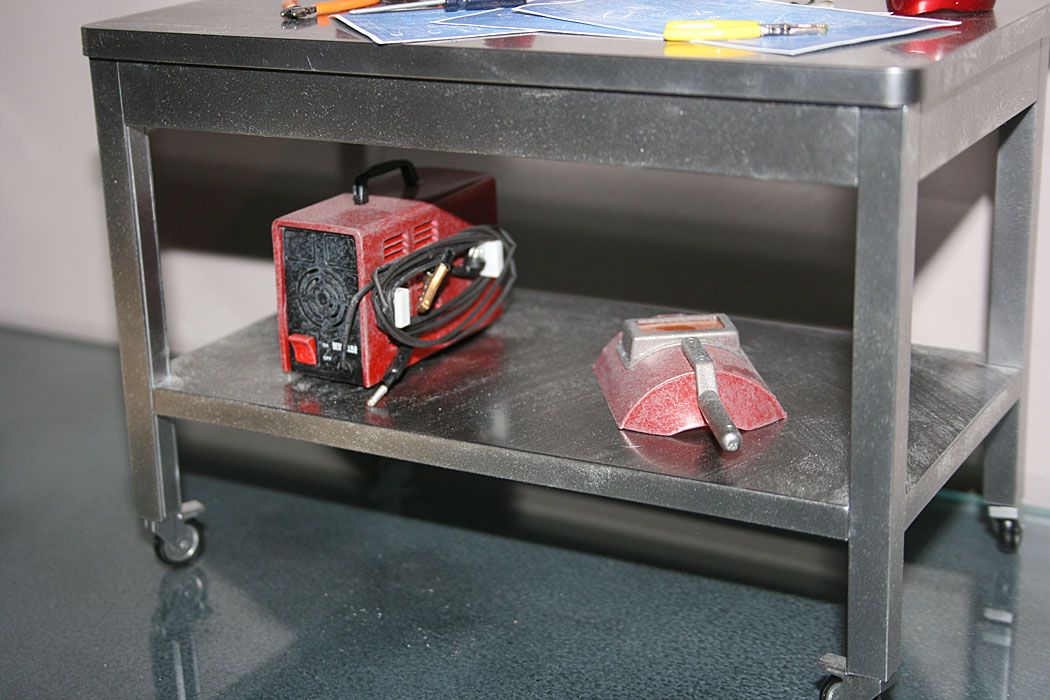
My wife bought me this 1/6 TIG welder for Christmas
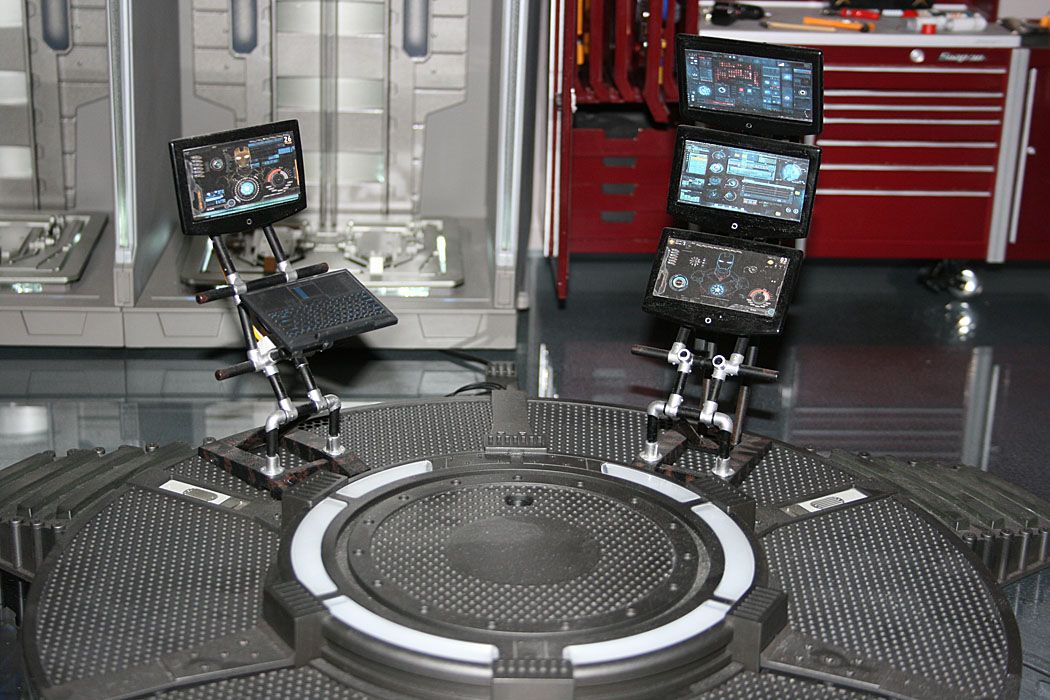
A couple computers with custom graphics
Here are a couple lose items that I may or may not leave in the final display. I’ll have more floor space once I build the side cabinets so that could give me more room to work with the
I wanted to replicate the look of the detail above the Wine Cellar Bays but the more I studied this picture the less I understood it, they don’t seem to line up with anything

So this is what I came up with:

My wife loves the way I set up Bruce here

This is a Snap On Bank, it’s about 1/10 scale but looks good in the back ground

This is a little wood crate I made, you can see 2 larger crates in the other pictures

My wife bought me this 1/6 TIG welder for Christmas

A couple computers with custom graphics

Here are a couple lose items that I may or may not leave in the final display. I’ll have more floor space once I build the side cabinets so that could give me more room to work with the


$10.99
$14.99
DC Comics, 12-Inch Superman Action Figure, Collectible Kids Toys for Boys and Girls
Amazon.com


Natalie Rushman
Super Freak
That is an amazing set up! And I love all the little pieces you used to really make it something special!
poseidon215
Super Freak
Wow that is a really great display setup. Great work dude. 
I wish i have the space to do something like this, but i dont have the time to dust my figures weekly, so i really need to rethink and how to built my display cab and incoperate this kind of setup
I wish i have the space to do something like this, but i dont have the time to dust my figures weekly, so i really need to rethink and how to built my display cab and incoperate this kind of setup
Manannin
Super Freak
Well holy crapola that is awesome. I know they are only small additions, but I really like the wooden crates with the Stark logo, nice touch.
Can you get a picture of the whole thing with a real human in shot, I just can't quite picture the scale of this. I bet it's huge in person... (that's what she said)
Can you get a picture of the whole thing with a real human in shot, I just can't quite picture the scale of this. I bet it's huge in person... (that's what she said)
Wow, I guess most of you are speechless, which is out of character for this forum
Looks great!
Sorry. I was working all day, lol. Too busy to check the forum.
Looks like you have to sit on the floor to enjoy your figures.
SERIOUSLY?? That's what you took time to post???
I don't really "have" to sit on the floor to see the figures in the wine cellar, The 3/8 thick glass offers plenty of unobstructed view.
Some are partially blocked by items on the work shop level but it look very cool.
That is an amazing set up! And I love all the little pieces you used to really make it something special!
Thanks.
I think a display like this depends on the items that flesh it out. I may not end up using everything but I will always have options.
Wow that is a really great display setup. Great work dude.
I wish i have the space to do something like this, but i dont have the time to dust my figures weekly, so i really need to rethink and how to built my display cab and incoperate this kind of setup
This display isn't that big, it is only 7 feet wide by 30" deep at this point.
Well holy crapola that is awesome. I know they are only small additions, but I really like the wooden crates with the Stark logo, nice touch.
Can you get a picture of the whole thing with a real human in shot, I just can't quite picture the scale of this. I bet it's huge in person... (that's what she said)
Sorry, I have never posted a selfie, anywhere, but the next time I have a friend over I post a picture
Looks great!
Sorry. I was working all day, lol. Too busy to check the forum.
I know that feeling
CupcakeMcGraw
Super Freak
- Joined
- Apr 13, 2015
- Messages
- 1,112
- Reaction score
- 220
SERIOUSLY?? That's what you took time to post???
Yeeeeah... that whole ten seconds of my life... <_<
I recognize the work that's gone into the setup and recreating half of a movie set. It just strikes me as a cramped and restrictive way to display a whole lot of very nice figures.
poseidon215
Super Freak
This display isn't that big, it is only 7 feet wide by 30" deep at this point
Yeah. But if i were to built a custom cabinet, i need to figure out the height of each self + i want to incorperate hulkbuster and delorean in there to. And ofcourse posing my avengers n gotg team dynamicly. And putting into consuderstion on what figures that coming in the MCU line.
#firstworldproblem lol
Yeeeeah... that whole ten seconds of my life... <_<
I recognize the work that's gone into the setup and recreating half of a movie set. It just strikes me as a cramped and restrictive way to display a whole lot of very nice figures.
"Cramped and restrictive......" Like a Ferrari
But seriously, this comment is actually hilarious.
CupcakeMcGraw
Super Freak
- Joined
- Apr 13, 2015
- Messages
- 1,112
- Reaction score
- 220
"Cramped and restrictive......" Like a Ferrari
But seriously, this comment is actually hilarious.
No need to get all defensive, man. Just voicing an opinion. I'm happy you're happy with your display.

RobertoBagg10
Super Freak
Re: Hot Toys “Straight/ No Radius” Hall of Armor Project
amazing work Dave cant wait to see more bro ")
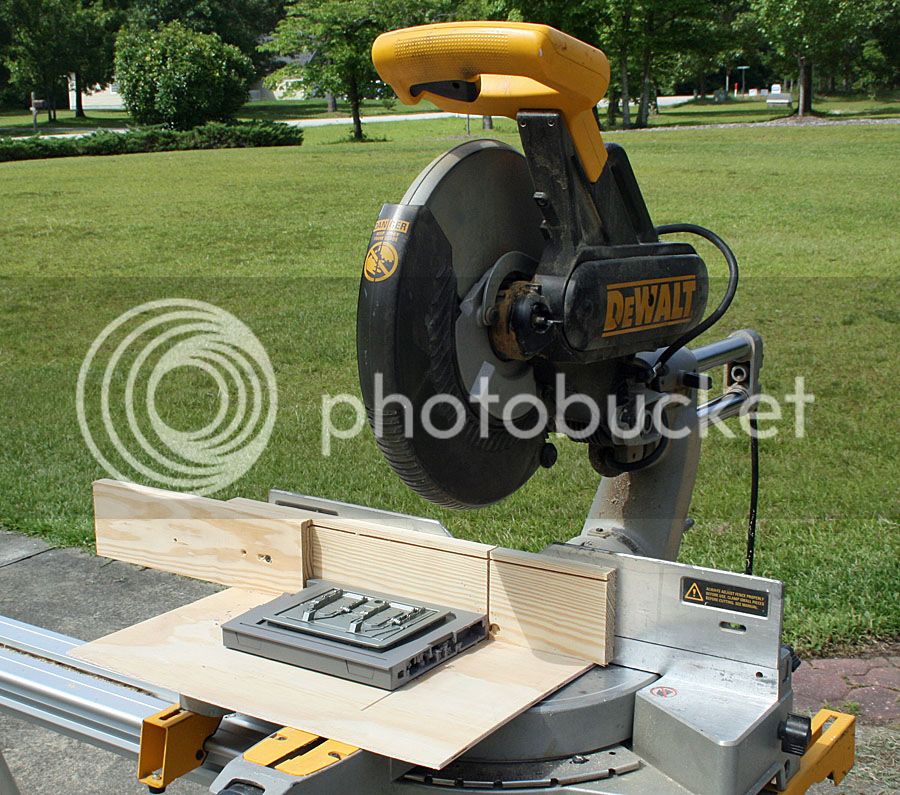
I was able to work on this today. So far I was able to get everything cut. Now I need to deburr all of the parts and verify that the lights still work.
Once that is done I can start hooking them together to make the 4 bay left and right units.
I sold some parts to help offset the cost of this project.
So far I sold 8 walls, a set of holograms, all 14 acrylic hologram panels and the extra bay from the 7 pack for a total of $340. I still have 8 walls and 6 sets of holograms left so this could end up not costing much to finish
Here is a brief explanation of how I cut the parts:
I made a quick jig to hold the base and top while I make the initial cut on one side with my miter saw and a special blade. Even with a special blade and a good saw This is a very violent process and if something is going to break it will happen here:
Then I cut the other side on my table saw because it is less violent and leaves a clean cut line:
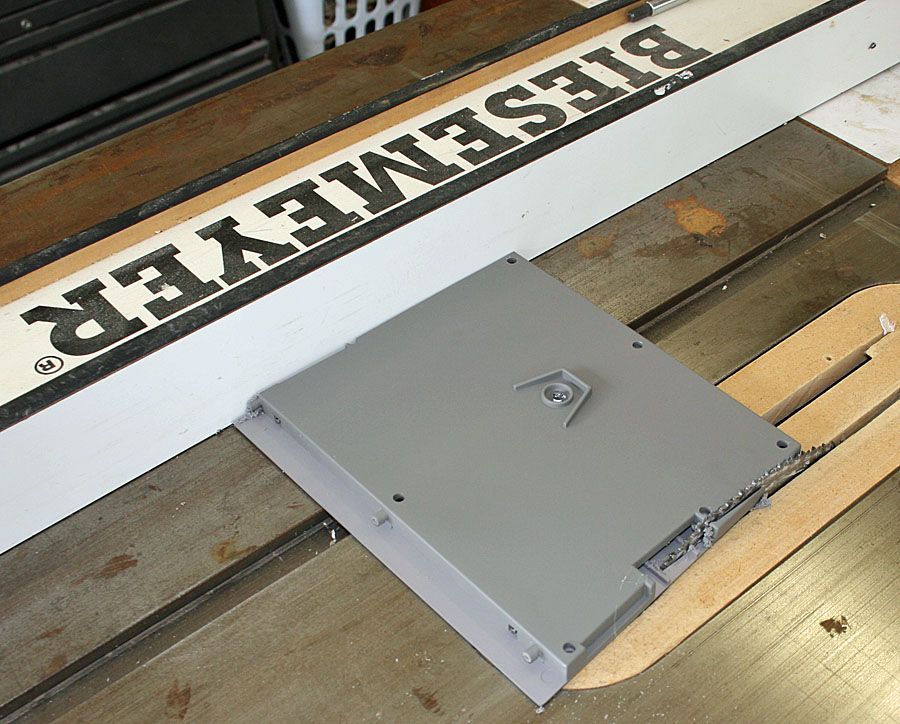
I also use my table saw to cut the backs. The first cut is a smidge over 8 3/8” and the second cut is 7 3/4”
Here are all six bays cut and ready for final assembly:
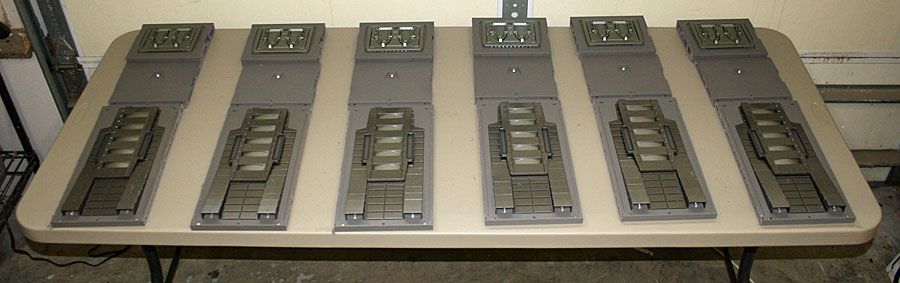
I’ll post some assembly pictures when I start putting them together.


amazing work Dave
cant wait to see more bro Similar threads
- Replies
- 84
- Views
- 10K
- Replies
- 0
- Views
- 1K
- Replies
- 19
- Views
- 5K
- Replies
- 11
- Views
- 5K