Mattel ghostbusters conversion (update 12-28-2012 PG1)

Collector Freaks Forum

Help Support Collector Freaks Forum:

This site may earn a commission from merchant affiliate links, including eBay, Amazon, and others.
Re: Mattel ghostbusters conversion step by step

I was thinking about using sculpey and fabric to make some elbow pads, but would gladly buy a kit (4 actually) to save the time. The web belt and backpack wire thingy would be great too.
 
Re: Mattel ghostbusters conversion step by step

Astro_zombie: Let me know if you want the pics removed. My goal was just to add them for informational purposes and to help get folks creative juices flowing.

picture.php
picture.php

picture.php
picture.php


Here's some pics of my progress so far with the rubber bits all cut off and the holes puttied, sanded, and painted. I didn't do a super clean and smooth job in the patch areas because I wanted some texture like the actual props.

I repainted some of the areas like the cyclotron and bumper(also added a screw) because the weathering was really heavy and phony looking on them. I went over them with some real subtle silver drybrusing and weathering pastels. I'll go over the whole thing again with pastels once I'm done with all the modifications.

Oddly I like the look of the ribbon cable even though it isn't super accurate. It is a concession I'll live with. :)

I don't know if its the plastic or some coating on the plastic, but it does not want to take paints well.

I need to get my thinner gauge brass rod and some styrene half rounds this weekend so I can remake the resistors and legris elbows.

- TGM
 
Re: Mattel ghostbusters conversion step by step

Good post thegreenmachine!

I don't want you guys to think this thread is all about me, feel free to post your own WIPs, questions about GB gear, and comments.

I would say if you can to give it a wash down with some dish soap and water. Usually its the oils from the plastic that wont take paint. I cant wait to see what you come up with!

I finished the main part of the belt gizmo
100_3893.jpg

And here is a side by side to my prop
100_3894.jpg
 
Re: Mattel ghostbusters conversion step by step

Sorry for the delay in updates. I'm still workin away on that kit, and my day job haha. Anyway here is a small update. Its a comparison of the Mattel head, Spencers head (painted by me), and the old BB head
100_3901.jpg

100_3742.jpg
 
Re: Mattel ghostbusters conversion step by step

:chewHey Astro, whut's up?>??? which ecto googles you prefer? The ones that comes with mattel's kit or the ones you had for the other (big sideburns) Ray.

Sal
 
Re: Mattel ghostbusters conversion step by step

I like the other ones I got on my old Ray for the fact that they have foam padding around the eyes and some other great little details. The lenses aren't 100% accurate but they were too nice to chop up and mess around with.

Also you question you asked about spencers head. I used citadel miniatures paint and gave his eyes 3 coats of gloss. Ill have some better pictures tonight when I make a small update. Elbow pads are still in the wroks but I fixed the gun tip and this things almost done.

cool astro, looking forward to updates. cnt wait toget hold of the stuff ugot of mine mate.
 
Re: Mattel ghostbusters conversion step by step

Ill have pictures of the gun up soon for ya Sal! Quick update for you guys though. Hes slowly getting there...
100_3909.jpg


The new hot toys body makes a HUGE difference in movement. As well as leather boots. I did use Mattels patches and leg hose though.
 
Re: Mattel ghostbusters conversion step by step

Nice progress Astro. Can't wait for your elbow pads.
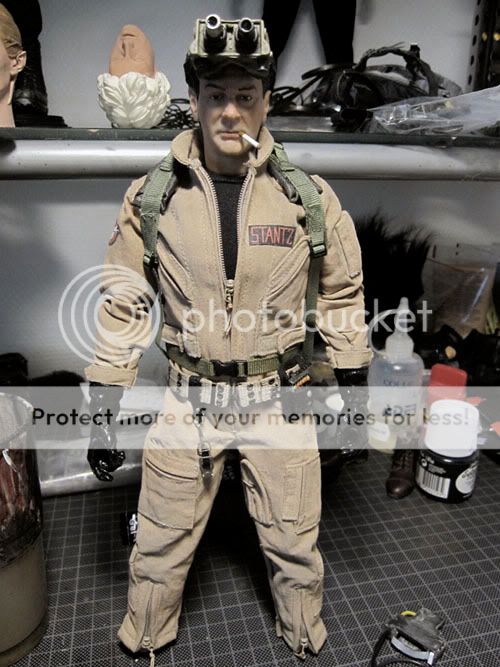
Here's my Ray WIP.

Head by SPencer
Goggles by Dragon
Flightsuit by Hot Toys (dye)
webbelt by Dragon
Custom belt hook and belt gizmo
Gloves by Hot Toys (repainted)

IMG_4628.jpg
 
Re: Mattel ghostbusters conversion step by step

WOW, actuall phisical contact!!!!!!!!!!!!!!!!!!!!!!!!!!!!!!!!!

hahaha Love it! Did you custom made the cigar? looks great
 
Last edited:
Re: Mattel ghostbusters conversion step by step

outstanding work so far elvis1976! Which pack are you going to use? From the gun on his belt it looks like maybe nicks?
 
Re: Mattel ghostbusters conversion step by step

outstanding work so far elvis1976! Which pack are you going to use? From the gun on his belt it looks like maybe nicks?


hey jon, seb was guna use nicks packs but after i mentioned to him about the size etc ithink hes using the mattel 1s now. they are better proportioned. nicks were nice but looked too big on the figures back.

ive got 1 of nicks build up and painted that he sent me with a trap, so imight jst get alittle case for them and display them
 
Re: Mattel ghostbusters conversion step by step

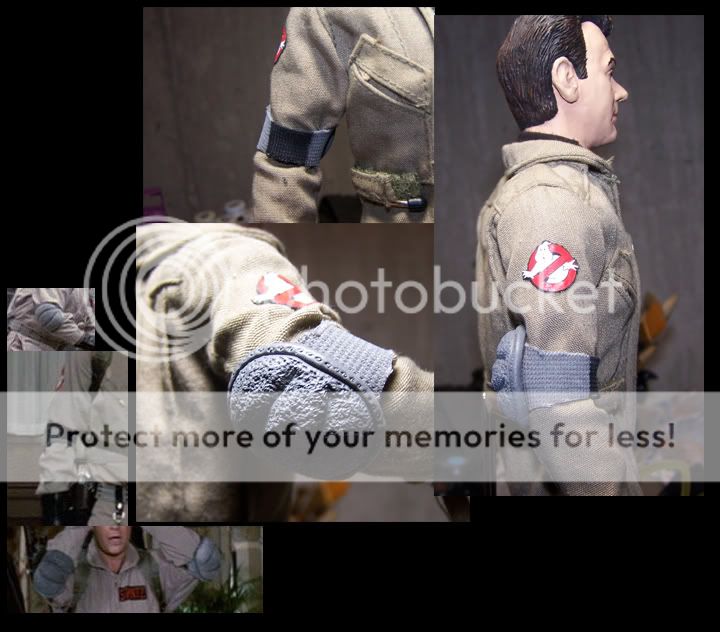
So after much trial and error I finally came to this as my final pad
Untitled-1-7.jpg

the pad is cast in resin and has room for the elbow to bend. I didnt want to make it too tight so that the elastic wont snap and so the arms still be bent sharp. I also cut the tops and bottoms of the elastic to give it a frayed look just like in the film. If this gets the okay from you guys then ill start the run. Any comments/suggestions on these pads please let me know!
 
Back
Top