ALIEN and ALIENS Thread...

Collector Freaks Forum

Help Support Collector Freaks Forum:

This site may earn a commission from merchant affiliate links, including eBay, Amazon, and others.
Status
Not open for further replies.
pjam said:
"I'll Go..."

DSC04253.jpg


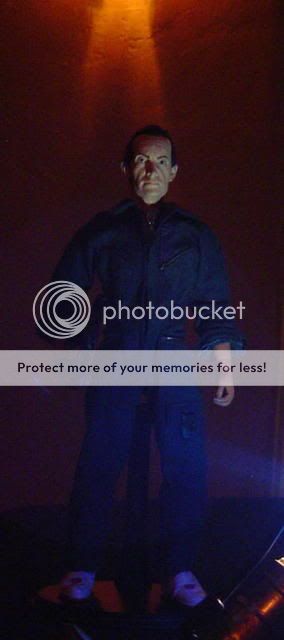
First reveal of my Custom Bishop (with laptop), seen Only here! Details to come... :cool:

Here's another shot...

DSC04259.jpg
 
Man, I LOVE this thread!

DBoz, great job on Drake's T-shirt graphics! Thanks again for sharing with us!!!

:rock:rock:rock

And pjam, an amazing looking Bishop!!! Please let us know what you used to put him together...you know we're all gonna want one, too! :monkey5 (I DID say "Please"!) :D
 
argghhhhh pjam ya beat me to it you bugger, lol. I'm resculpting a frank black to a bishop as well. Oh well, I was going to make the half dead version with his white guts hanging out from the power loader battle anyway :lol

yours is GREAT. (where did you get that blue jumpsuit, I've been looking around hut havent found any in the usual places yet)
 
pjam said:
"I'll Go..."

DSC04253.jpg


First reveal of my Custom Bishop (with laptop), seen Only here! Details to come... :cool:


What'd you use for shoes bro? I wanna accurize mine...

He looks GREAT by the way! Who did the paintup?
 
Thanks Guys,
This has been a WIP project for three months. I will reveal more when it is 100% complete but I got to tell you this is a ONE of ONE and I don't know if there will ever be another like it because the head is a custom one of a kind. It has real hair and moveable eyes. As mentioned I will reveal more details soon...

So, a breakdown

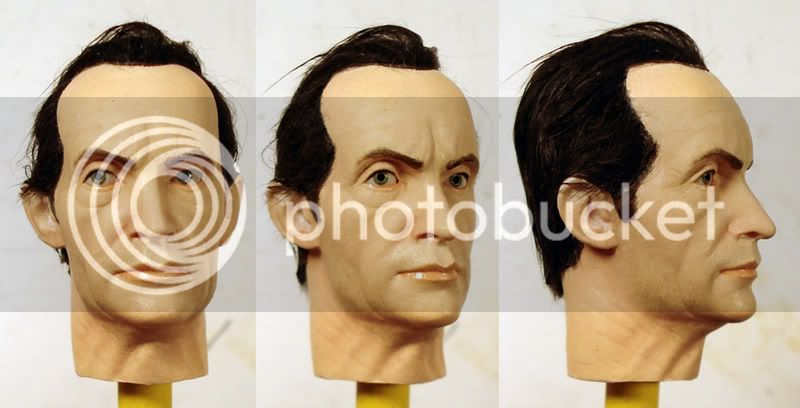
1) Frank Black head with real rabbit fur hair, hazel "moveable" eyes. They are embedded inside the head and have a special catch in the pupils so they can easily be moved with a pin. This head is a masterpiece and was made by a Customizer who is well known in custom circles. I think he is a genious and I had to beg him for it, he finally obliged as a special favor. The FB HS is dead on IMO.

bishopfinal.jpg


2) Body: Short Dragon Pieter

3) Flightsuit: BBI Walker. Not 100% accurate: Bishops' collar was basically trimmed off in the Film. I still have to figure that out but it's close enough for now.

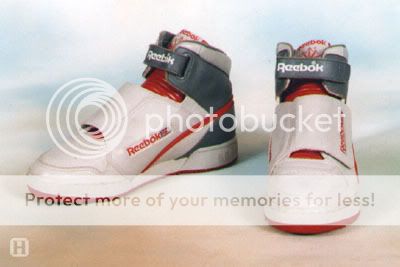
4) Shoes: Modded SS Connor Nike's. I modded these myself by adding a strap and painting them using prop ref photos.

These are Bishop's Shoes. They are not Ripley's

reebok1.jpg


5) Laptop: BBI War Journalist: Painted black and modded. The keyboard lights up (has phosphorous paint)

6) Watch: I forget, had to paint black around face (still needs more)

Knife too! for those breakfast moments... :lol

He will also have a neckchain... He still needs color correction (to match face with arms)

I will post more pics when he is 100% Complete
 
Last edited:
dekadentdave said:
According to the Harry Harris reference site, Bishop is wearing Ripley's Reeboks.

But without the upper extensions.

That head is AMAZING Paul!!!!!
I am fine with mine, but I think rabbit fur additions are in his future, as well as a slight repaint maybe.
I like mine, but your's has more accurate parts. I have some GREAT cloth Sulaco patches if you need them for his jumpsuit. Just one set though! (Before the herd comes for them! :lol ) I can send them with your next...whatever...
But GREAT figure!

And..."Daddy" Les is wondering...where be them Hudsons? :D
I think I can hear the swooshing of brushes doing some Darkartist dirtyin'(TM) all over the country....
Do I need to post a "How to" for Hudson's arm bandage? I might can re-approximate what I did in some pics. It's not hard at all, but you need to paint his arms up dirty first, then wrap the bandage, then dirty it some also. Not hard, but some steps that are hard to explain.
Let me know and I will try in the next day to do this. If you need it. :D
 
Not at all. I took some pics but they didn't turn out so well. My camera sucks. Maybe I'll post my fuzzy images when I get home tonight.
 
dekadentdave said:
Not at all. I took some pics but they didn't turn out so well. My camera sucks. Maybe I'll post my fuzzy images when I get home tonight.

That's cool! So you don't need loose cloth then. That would solve this for more folks. You might need to spell out what you did then, for those wanting the bandages. Might be a lot easier than my approach.

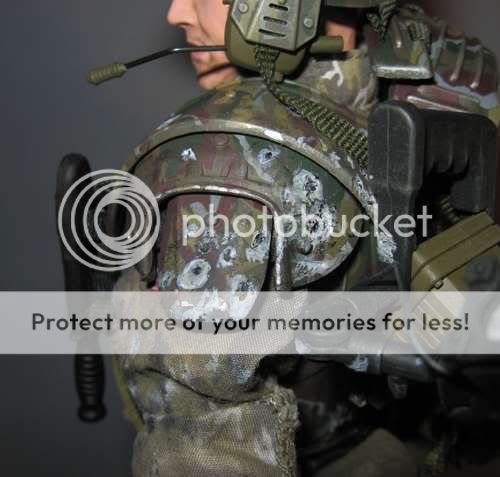
Oh, for mine's acid burns in his armor, used a round engraving bit on my Dremel tool It is designed to engrave out rounded scores in surfaces. Works better than some heated tool, and is more controllable. Any good image of the burns (I just stopped my DVD on shots, didn't grab any due to so many different frames referred to), shows that some of the holes sort of were jagged, and a dremel bit makes that look right.

Just another thought.
 
What size bit did you use? I thought about using a soldering tip to literally burn it into the plastic and have some melted areas. Did you dry-brush silver onto the armor to do the paint wear or did you use a silver paint-pen?
 
dekadentdave said:
What size bit did you use? I thought about using a soldering tip to literally burn it into the plastic and have some melted areas. Did you dry-brush silver onto the armor to do the paint wear or did you use a silver paint-pen?

No melted. Dremel only. I tested on a sheet of styrene, and you know, thought, well...burn it, OF COURSE. But then, I didn't like what happened. The edges got all raised and sort of well up. You can't control the burn. It melts the plastic in a non-acidic way. Instead of removing plastic, it sort of rearranges it. Made for bad looking scars.
So, I got my smaller rounded bit, it looks like a teeny rotary bladed ball mounted on the tip of the bit, and sort of score it out. Made a hole here and there, and then, worked back out. Removing materal, and smoothing the edges in downward ways, so it looks more dripped through. Was much more satisfied with that look.
If you just stick a hot pin in it, or a soldering tip, it mushes outward, like a splash.
With the Dremel, you spend more time removing, but then, you can score some nice "splashes" into the surrounding areas that look right.

And, since you can't sand it, to smooth the edges, without removing the paint patterns, you just slowly work the engraving bit in larger and larger patterns until you sort of score out the bent and "melted" look into the plastic.

To paint, it is not silver. That would look like a clean score or scrape. No. The acid burns into the "metal" armor, so it burns paint and metal too, leaving a light grey ring around the hole. You can do some blackening in the holes themselves too, but there is a clean, random shaped grey acid burn around each hole. Look at some of the frames when he is in the APC (I don't know if you've been keeping up with current events" OR "This ain't happening!...) and you will see the actual colors better. They are smoking some at first.

But no silver. Think, chemically burned surfaces.

Here is some ref for what all I did.
It is a LOT more fun than burning it in...but takes a little time. Not too long really.

HUDSON004.jpg


Hope this helps.

Oh, if you leave his light on, you can blend it in by adding just a few small scores to the side of the light. I did, just to make it make sense, because I figure the light got hit too. And don't forget to make holes in his shirt sleeve, and paint some "burn" around them too. Don't have to be too many. ANd his sleeve is dark and dirty from the burns...
 
Wow, that Bishop head looks almost alive up close! I'm glad to see someone is into doing 'real' hair and making it look that good. Since he's a one of a kind, it looks like we'll have to hope that HA will kindly whip up a remodeled Frank Black as Bishop hs for us then. Anyway, can't wait to see what he looks like when he's complete. :cool:
 
I was actually thinking about putting an LED into the lamp but I'd have to figure out how to get the lithium battery in there.
 
Thanks for the great armour weathering tips, Les! I was thinking of doing the same thing to mine. Actually melting the styrene ends up looking exactly like that, melted plastic. The method you described in detail is the perfect way to achieve the best results. Nice picture, btw. I like the way you weathered the burns into the painted metal and his shirt sleeve, too...it looks so realistic that way. :D
 
dekadentdave said:
I was actually thinking about putting an LED into the lamp but I'd have to figure out how to get the lithium battery in there.

If you could open up the case part of the lamp, do you think there would be enough room to fit a battery in there? It looks like it might be worth a try. The wire already runs into it, so you could just replace it with a real wire connected to a grain of wheat bulb or whatever in the lamp... just a thought! That would be so cool to have actual working lamps!
 
Status
Not open for further replies.
Back
Top