Hot Toys Darth Vader : tips , tricks and any other mods

Collector Freaks Forum

Help Support Collector Freaks Forum:

This site may earn a commission from merchant affiliate links, including eBay, Amazon, and others.
Glad it worked out for you, Tali! :yess:

I'm actually wondering if I should go further with the nose mod. When I initially did it I just shaved it down a tiny bit so that it wasn't sticking out beyond the nose. I ended up glueing it back in so I'm wondering if the bond will be much stronger this time.

I tried the same method on the second helmet I had as well but that one did have a bit more glue and I put a small scratch in the front of the plug. Nothing that couldn't just be painted over anyway but I just gave up since I had done the first one anyway and only have one Vader to display. The second helmet I got has a nicer richer black to the dome though so maybe I'll just give it a go on that one again if the other plug is glued too strongly.

:hi5:

Oh, there was some singing of TonTon's praises when that nose plug just came straight on out.:lol

Sorry to hear the other one had more glue, and yeah - I'll be leaving the plug out. You could just do the putty on top of the plug like Matrix did if the plug is reglued far enough back.
 
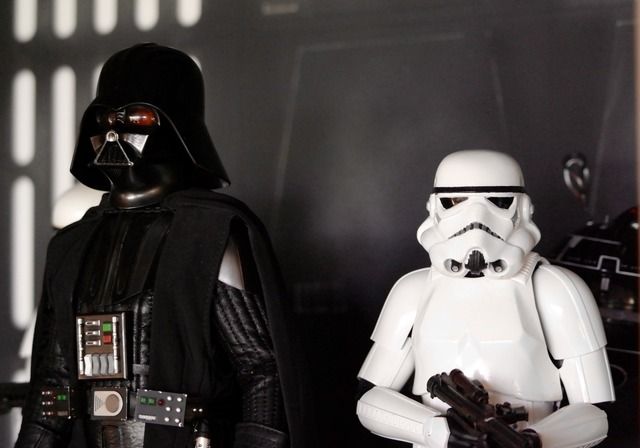
I've updated with belt box/buckle weathering, set the helmet forward and the lens mod. Still too cowardly to go back to the nose mod.


Did you try from the front?

And what are people using for the eye mod - silvered paper, or just something white behind the lenses?
 
My current Vaydahs.
Mod I did on HT: chestpiece repaint, belt weathering, SSC ANH gloves.
I'm gonna buy a second HT helmet to go with the old SSC ANH Vader before going all the way (eye+dome+nose) with this one.
 

Attachments

  • Vaders.jpg
    Vaders.jpg
    703.2 KB
Did you try from the front?

And what are people using for the eye mod - silvered paper, or just something white behind the lenses?

I haven't tried from the front...i'm really nervous about that. I used tinfoil wrapped in some hard backing from a tape box and rounded it so it wrapped on the inside of the helmet in a semi U shape. Just letting it rest at an angle wasn't enough for me.
 
I haven't tried from the front...i'm really nervous about that. I used tinfoil wrapped in some hard backing from a tape box and rounded it so it wrapped on the inside of the helmet in a semi U shape. Just letting it rest at an angle wasn't enough for me.

Inspired by TonTon, I took a new X-Acto (ie. very thin intact tip) and inserted between plug and nose housing (just the flat sides, not curved top part) and pushed as far down as it would go over and over, both sides. With little effort, it came loose. It only took a few minutes, though I guess it depends on the amount of glue you have.
 
Did you try from the front?

And what are people using for the eye mod - silvered paper, or just something white behind the lenses?

I cut up a cheap head sculpt, and wrapped it in aluminum foil. I think an actual face shape set inside the mask adds depth, and the contours of the eye sockets and cheek bones adds to the realism. Totally uniform and even amber-red lenses looks off to me.

Here's some pics of my mod

97904b96d07c292fa30c82c90d077484.png
9e78ac9d0848cbb568f49c3a854ad727.png
c1fdb11de7f575460906c63cabce91ff.png
79d5f1f0a14fd765f3aac89f7ba97ac9.png


Sent from my Motherbox PING PING PING PING PING PING PING PING
 
Last edited:
Great - thanks for that! And to get the dome off, it's just a firm hold and twist, and to get the halves of the facemask apart, it's just a screwdriver from below, right (in the area where the neck ball joint goes)?


I've been doing a really close look at the ANH mask and two things I saw in comparing the HT sculpt, and things WTC seems to have done that I hadn't noticed before:

(i) The grill sculpt seems to be missing a horizontal strip (maybe 1 - 1.5mm high) right at the very bottom of the teeth. The teeth aren't supposed to go that far down as the HT sculpt does. It seems very minor, but it's a key aspect in terms of likeness.

(ii) painting the mesh behind the teeth a thinned out black, so it's more black/silver as opposed to straight silver. The silver back there seems too bright.
 
For the dome I wiggled, not pulled. The wiggling side to side made it come off quick and easy.

I think I'm the only one who used a screwdriver and that's a last resort. My mask seemed almost impossible to separate because all the glue so you should play it by ear and see how easy or difficult it is to pull apart. I did all the things you're not supposed to do...so don't use the screwdriver unless you have to. I used it from the top after I was able to get some separation at the seam and I just wedged it in the middle of the gap and twisted side to side to get the glue to break free at the pegs. But the plastic bent at the top, which is why I say last resort. Check with others before going my method.
 
Thanks to the posters for the idea - ended up using the SSC Deluxe vader boots and attached them to the HT feet and shin guard. Like the look a lot better now, and has the straps wrapped around the back of the shin/leg. Still way to afraid to do the nose mod. DSCN0897.JPG

PS I love how my camera cannot take a decent pic with indoor lighting....lord
 
Could you post a clearer pic of the boots? I've thought of doing this too. Was it easy?

I'm a bit confused though, you're using the HT shin guards too?
 
Could you post a clearer pic of the boots? I've thought of doing this too. Was it easy?

I'm a bit confused though, you're using the HT shin guards too?


Yeah, let me see if I can take a better shot. (i've had two margaritas, so yeah, shaky cam still) I cut the 'boot' part of the shoes off, then pulled off the ROTJ style (shiny) shin guards, leaving just the black rubber 'boot' itself. Glued the HT shin guards to that, and have the feet separate. Pics in bound.

DSCN0900.JPGDSCN0901.JPG
DSCN0905.JPG
View attachment 285740
DSCN0906.JPG

Personally, I love the Fett stand so I tend to use that for Vader. The left one was super easy, The other was not....lol. If you look closely, I slightly warped the one shin guard when I popped it in boiling water. I would not advise that. Way too hot for that.
 
Inspired by TonTon, I took a new X-Acto (ie. very thin intact tip) and inserted between plug and nose housing (just the flat sides, not curved top part) and pushed as far down as it would go over and over, both sides. With little effort, it came loose. It only took a few minutes, though I guess it depends on the amount of glue you have.

So I just got the nose plug out on my second Vader dome with my fingernail. Must have made it a bit loose way back when. Cut off a few mm from the back and pushed it back in so now it's nice and recessed.
 
Ah, I get it. That looks good. So you took the back of the deluxe boots. And kept the HT shin guards, right?

Right, sorry for my crap explanation!

So I just got the nose plug out on my second Vader dome with my fingernail. Must have made it a bit loose way back when. Cut off a few mm from the back and pushed it back in so now it's nice and recessed.


So when you guys are cutting away the clear plastic neck peg, are you just reinserting it loose, or do you reglue that part?
 
I haven't glued my helmet back up yet, but I don't think it's necessary to glue the clear plastic neck socket back in. It looks like it's seated pretty firmly once the front and back of the mask is squeezed together.


Sent from my Motherbox PING PING PING PING PING PING PING PING
 
Back
Top