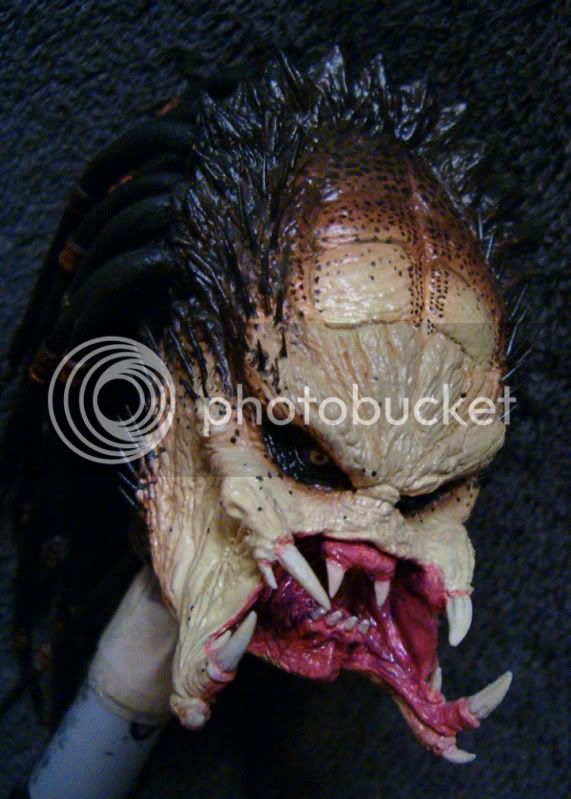
HT Exclusive Wolf Predator: Ever wonder what he looks like without acid scars.

Collector Freaks Forum

Help Support Collector Freaks Forum:

This site may earn a commission from merchant affiliate links, including eBay, Amazon, and others.
Dip your tool in Vaseline before sliding it along the putty. Now get your mind out of the gutter. Vaseline helps the sculpting tools not stick and pull the putty. You can get super fine details with this stuff, and you don't need to bake it. The only drawback to this is that you need to work in small sections at a time. If you get over ambitious, you may run out of time to refine all the details before the whole thing gets stiff. I try to work in small areas that can have clearly defined borders. Then the next section runs right up to, and sometimes over, the last. There were around 25 different sections I sculpted to get this whole thing done. Once it's set, it can be handled all you like, and can even be Dremelled immediately.

This stuff can also blend itself invisible at the edges; just press and drag outward from the main sculpt body to erase edges or drag them into other details like existing wrinkles.
 
My god Surfer you are A-freakin'-Mazing man! I'm still trying to hunt down an elder for cheap to have you kitbash it into a Scar for me. Damn now the custom wolf. Maybe someone can give wolf an AVP armor and make it look like when he was still one with the clan before he went off on his own as a lone wolf.
 
wow thanks for the tip on the putty surf !...I've been using tamiya putty for years and I wanted one that has a quick drying time like the one you're using...quils on the wolf looks excellent..might keep an eye on those on Ebay too lol...

Rob
 
That looks great! Nice work bro! Love the details!
I prefer him with the scars, though. They give him character.
 
Paintedtop.jpg


I use Folk Art Latex Acrylic paint found at Michaels. I thin it with water and airbrush it on.

I started with a base coat of Ivory White, then added Linen with a bit of Mint Green (he has a very interesting skin tone like mint and vanilly ice cream melted together). I kept the Mint almost unnoticable so that the head wouldn't look too off from the figure body. Then I started the two tone with Accorn Brown, and used that to put a subtle wash into the details to define them a bit. As the brown tones go out to the edges of his head and face, I swtiched to Dark Brown to deepen all but the borders of the Accorn, and eventually Black at the outermost areas.

The eyes are Linen with a spot of Red which is almost totally obscurred by the Black pupil. I used Purple to define the iris shape and fill in the rest of the eyes.

The mouth is just Ivory with increasind amounts of Red mixed in for washes,and eventually Purple mixed in to create depth.
 
Man, I can't stop looking at the finished pictures.

I absolutely can't wait to see that head on the actual figure.
 
Folk Art has several finishes in spray can form. For plastics and other hard surfaces I just use the flat coat because it looks semi-glossy anyway. That's what I used on this. The can is light green.
 
Thanks! I really wish I could keep them all, but it's nice to know they are out there being loved, too.

I know what you mean Surfer, once you put your heart & soul into customizing a figure, it's almost a part of you because you materialize your thoughts. Not everyone can do this, it's a skill you either have or you don't. You, my friend, have more than a skill......you have a gift. Thank you for sharing that gift. :monkey2
 
Thanks! I really wish I could keep them all, but it's nice to know they are out there being loved, too.

I can imagine. I love making custom figures (on a MUCH smaller scale than you) and most of the time, I'm very proud of my work. I'd hate to have to think to let it go. Guess its all a part of the job.
 
Back
Top