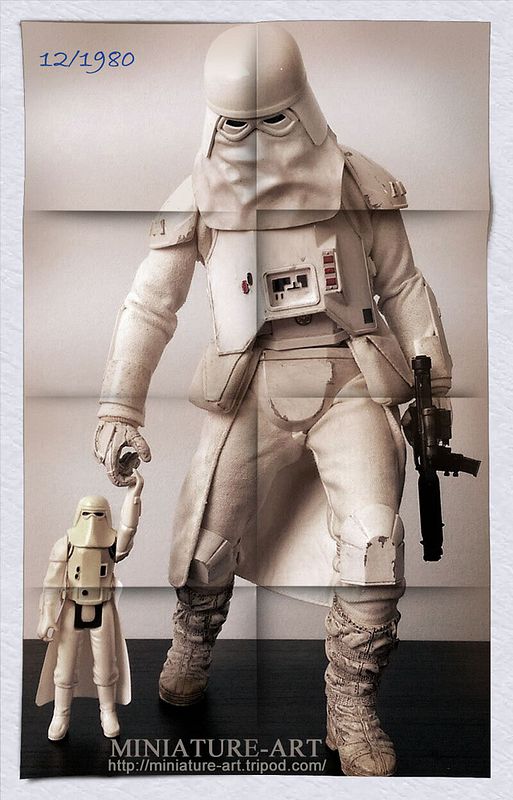
MINIATURE-ART
Freaked Out
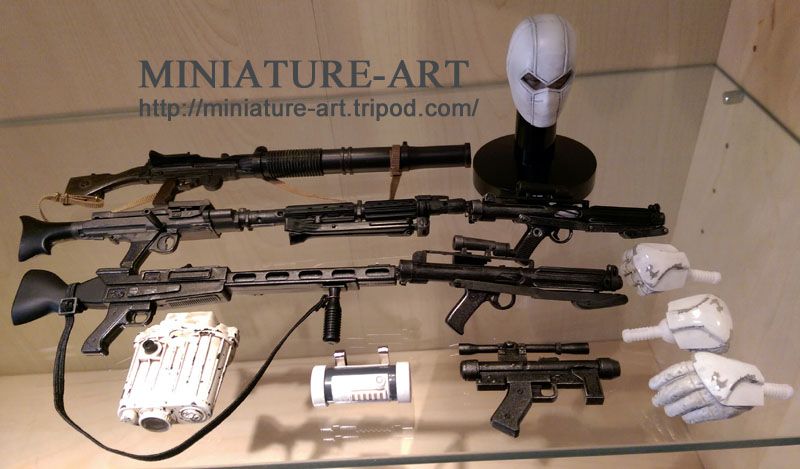
Hi all, I haven't posted in a while, since my custom 1/6 Jim Lee Hush Batman last year. I purchased the Sideshow Snowtrooper back in 2013 when it was first released, opting for the Exclusive version with the Kenner style long blaster rifle.
I think the figure out of the box is excellent, the highlights being the realistic weathering on all the hard armored segments, and sharp tailoring on the different layers of clothing. In addition the separate boot feet and tops allow deep stances. The exclusive vintage Kenner style blaster is a great nod to long time fans of action figures.
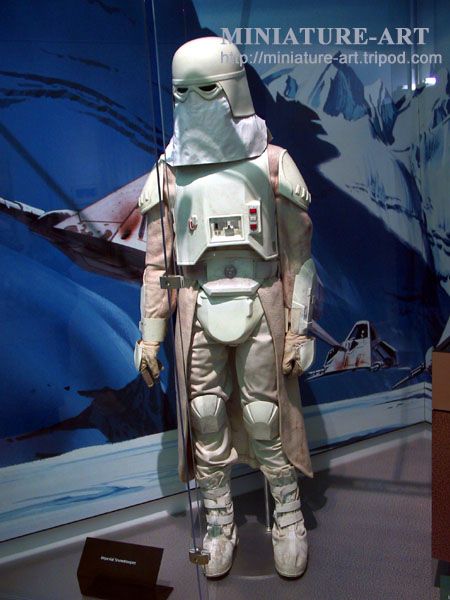
As most of you know, I'm a Snowtrooper fanatic, and I've studied the actual costume, even viewing examples as they have gone on various Lucasfilm tours. Over the past two years, I've had an opportunity to refine certain aspects of the Sideshow Snowtrooper, to better reflect screen accuracy and poseability of the figure.
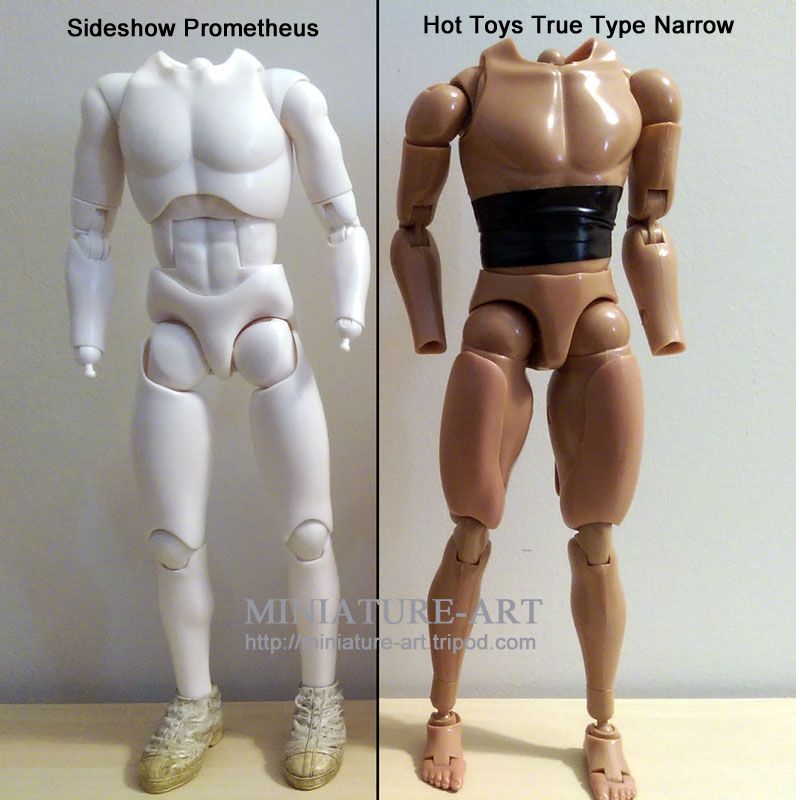
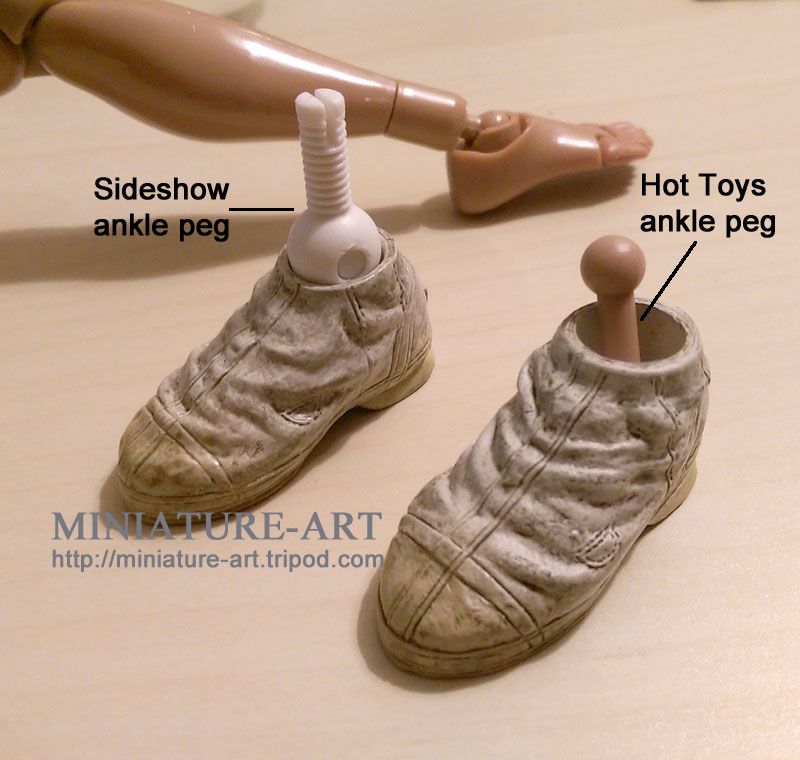
Body swap/joints- I found the stock Sideshow Prometheus body a little loose especially in the hips. In addition the body did not pose as naturally as my favored body, the Hot Toys True Type. I used a newer version of this body which has longer ankle sockets and the longer barbell style ankle joints, resulting in a slightly taller figure.
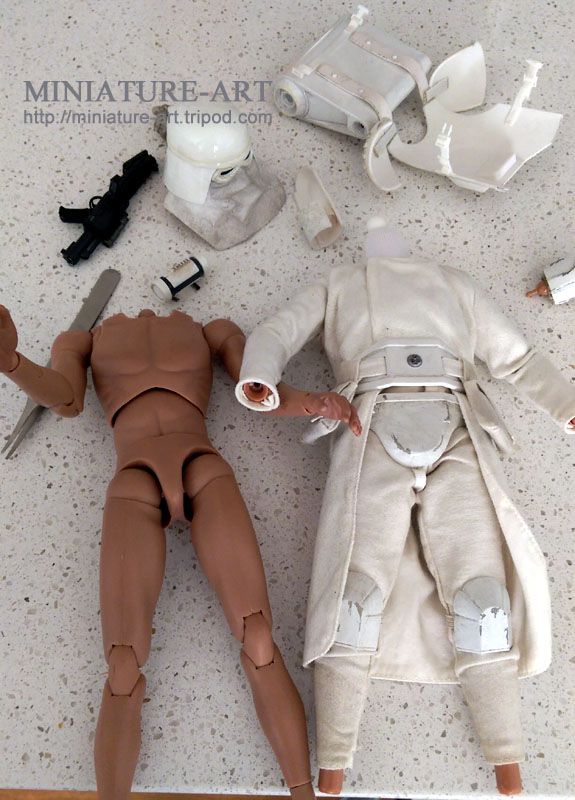
I used the original Sideshow neck, as it didn't change the height of the helmet on the shoulders and fortunately it fit the Hot Toys True Type body without modification.
The feet were removed from the Sideshow prong style ankle joints by immersing the foot in hot water. When the foot was pliable, a pair of Hot Toys barbell ankle joints were simply pushed into the aperture.
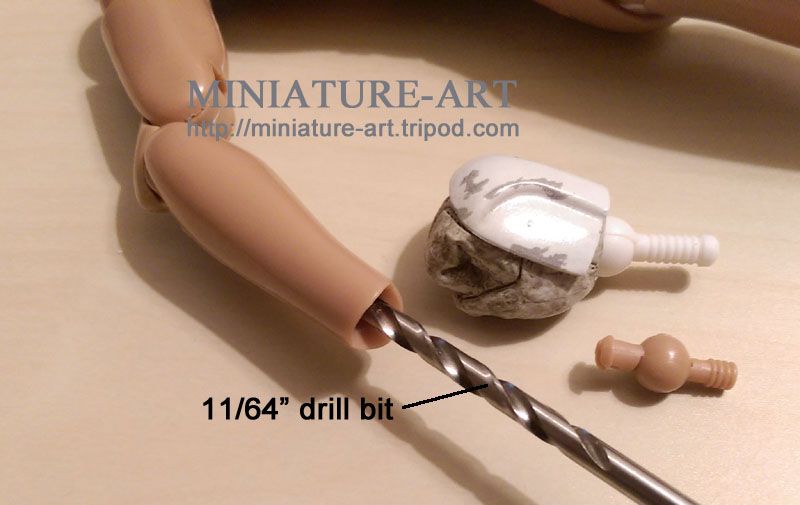
Hands and wrist joints- I prefer Sideshow's wrist pegs, they are molded in a white color and the longer pegs are more secure. To adapt them to fit into the True Type body, I deepened the forearm holes with a 11/64"dia drill bit.
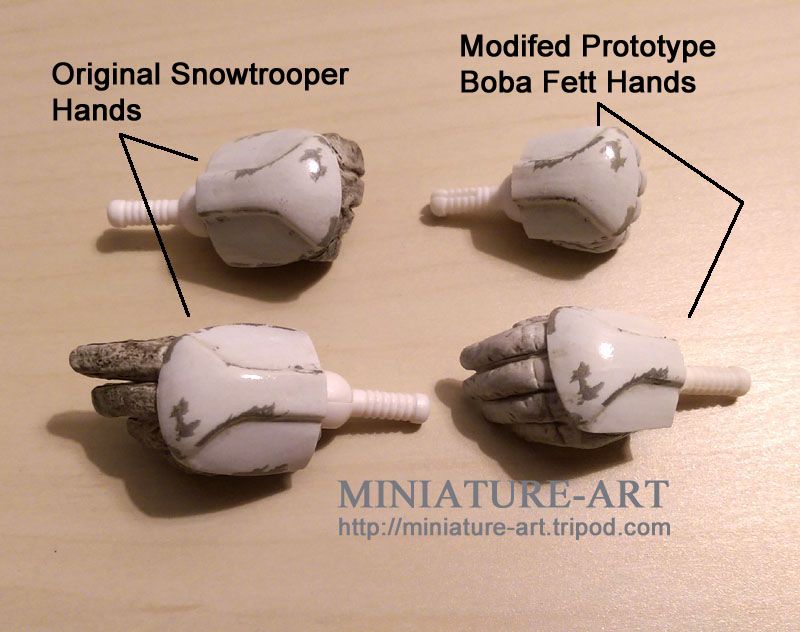
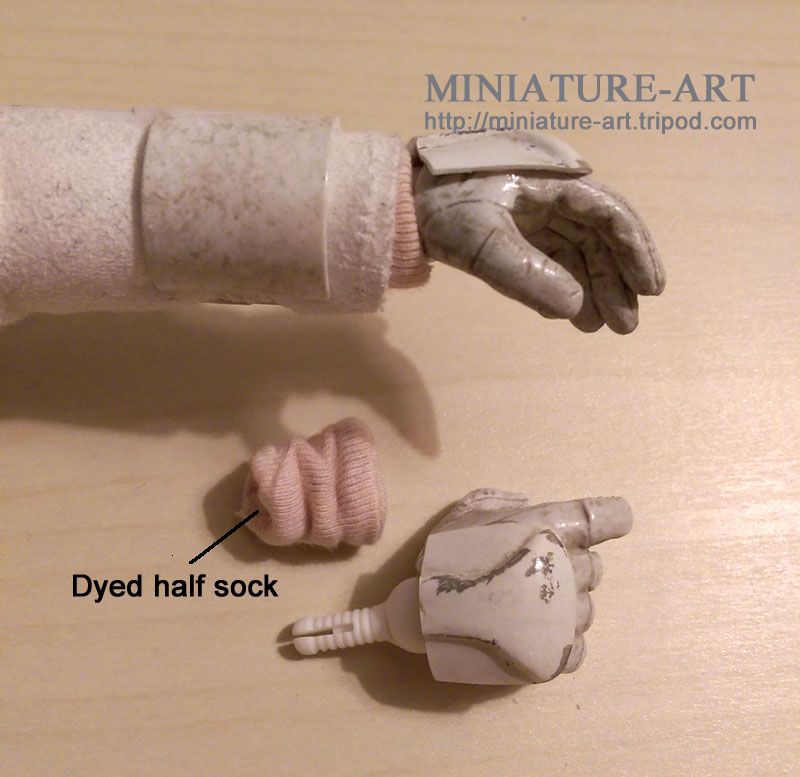
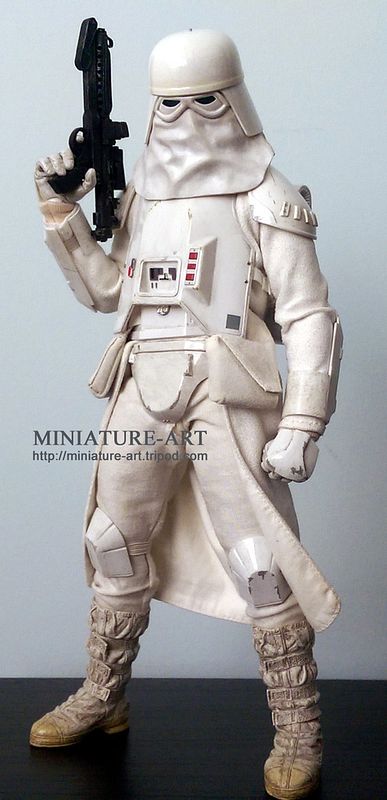
The actual Snowtrooper costume used thin gardening gloves, so the thick insulated hands as sculpted by Sideshow looked oversized. I used Sideshow's Prototype Boba Fett's hands as a replacement, cutting down the hand armor to fit and gluing them in place. In addition, a pair of 1/6 half-socks was dyed a light brown color and used to simulate the cuff of the gloves. They are a great way to hide the wrist ball-joint when the hands are flexed.
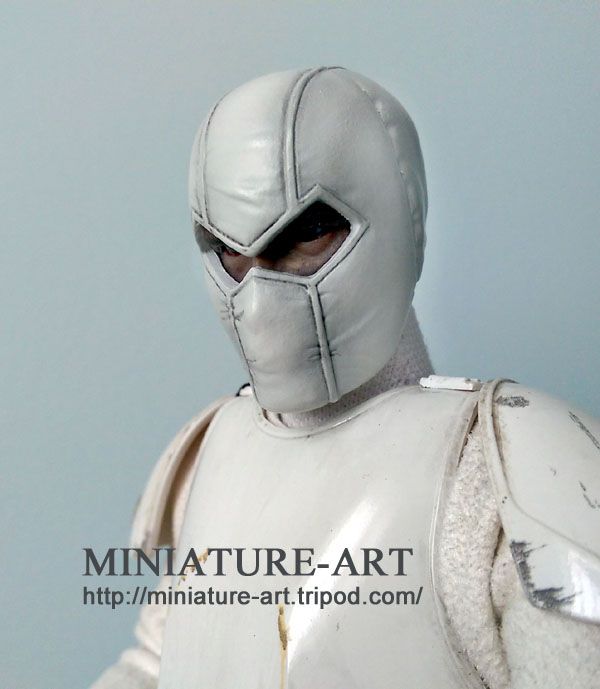
Cowl- The face cowl on the actual costume was cut flat in the front with the corners slightly rounded off. It was actually rather short and did not extend past the top of the domed portion of the chest plate. I liked the sculpted wrinkles in the Sideshow cowl so I didn't replace it with a thin vinyl material. Instead I trimmed the cowl shorter in front and sides using pictures of the actual costume as reference.
On the costume, the cowl is made of a smooth and shiny vinyl material, so I repainted the cowl in a brighter white color with minimal weathering to be more accurate.
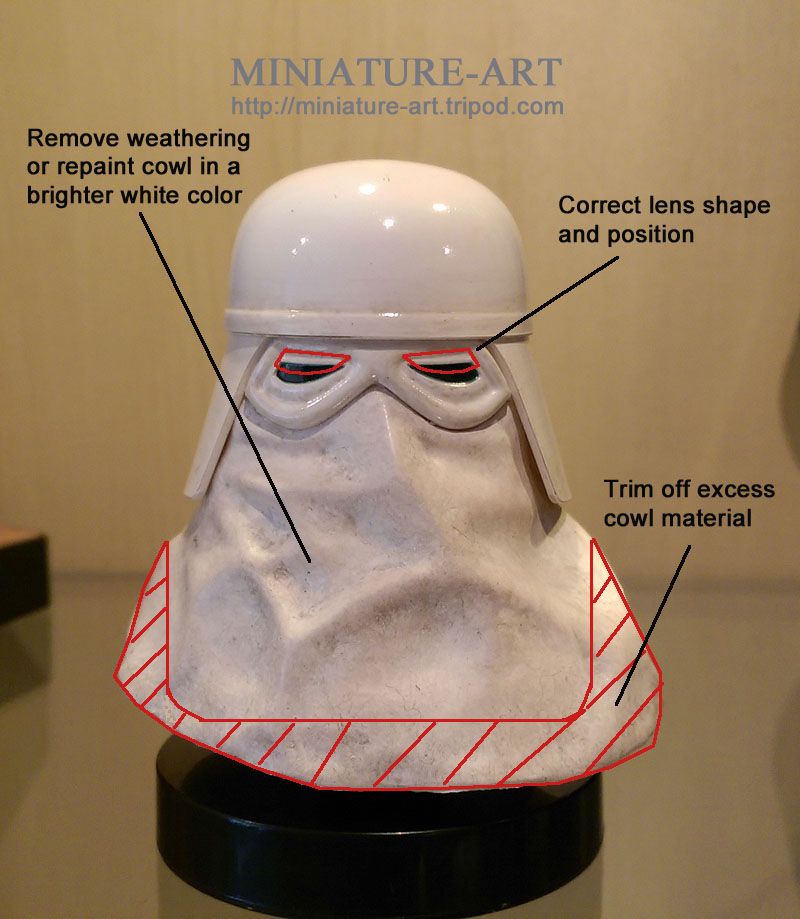
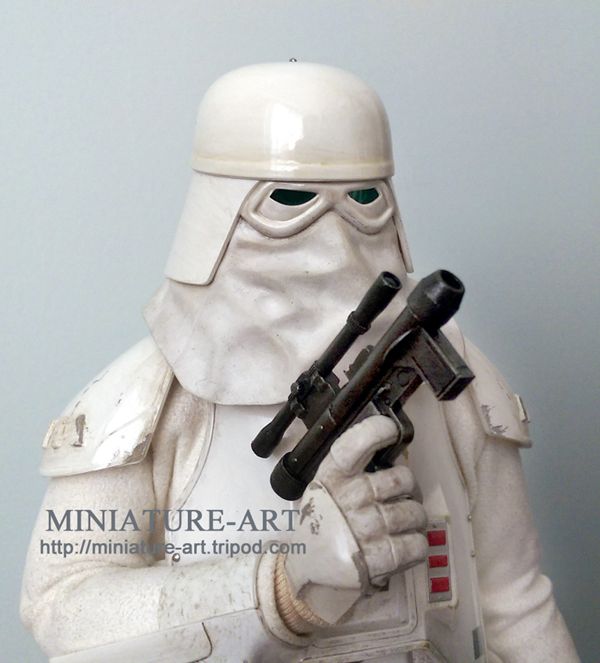
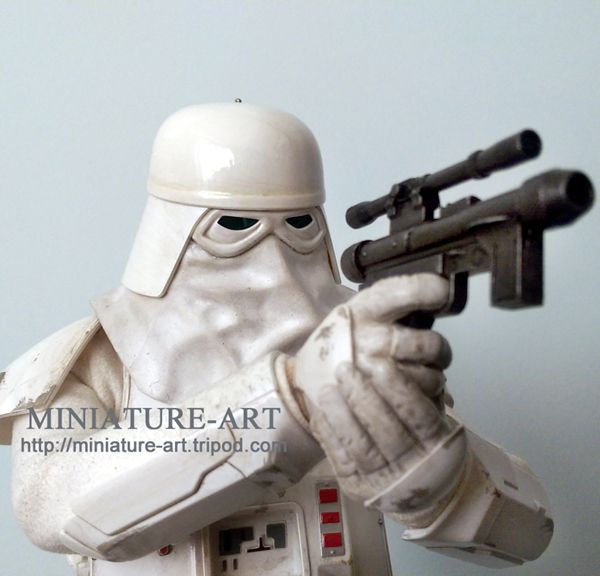
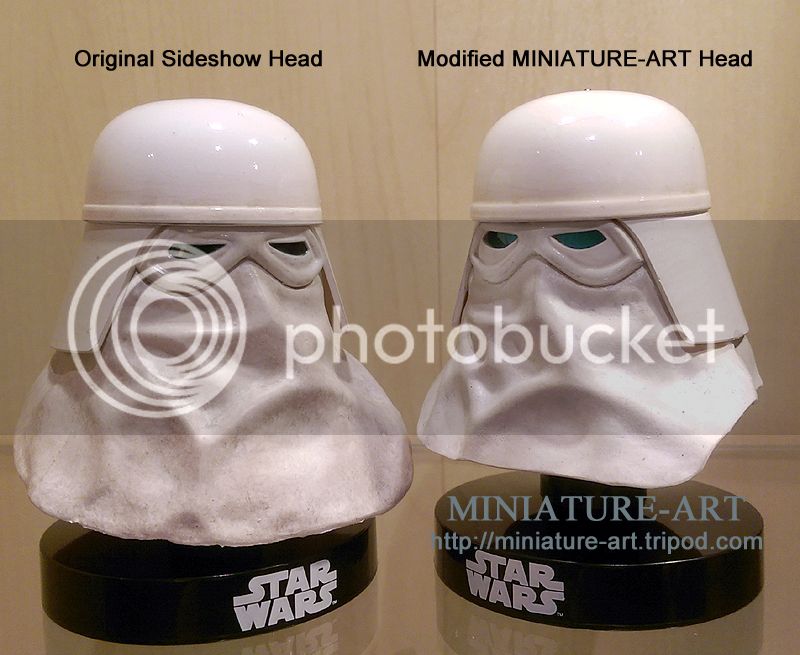
Lens- The biggest complaint most people had with the figure was the "squinty" eyes that looked too small. The original CAD drawings of the Sideshow sculpt showed accurate sized eyes so an error must have been made during production. Upon closer inspection, simply enlarging the eye holes wouldn't suffice. The problem was the lens shape was entirely wrong and too low on the visor/faceplate as well.
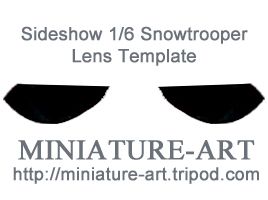
I realized fixing the lens shape and location will require a bit of work, precision one at that, and I would need to match the shape as well from left to right side. Looking at actual costume images of the Snowtrooper helmet, I realized that even on the actual costume the lens weren't symmetrical from left to right. So my aim was to correct the lens shape as accurately as I can by resculpting them in a higher position. Below is a template of the corrected lens shape I used on my figure.
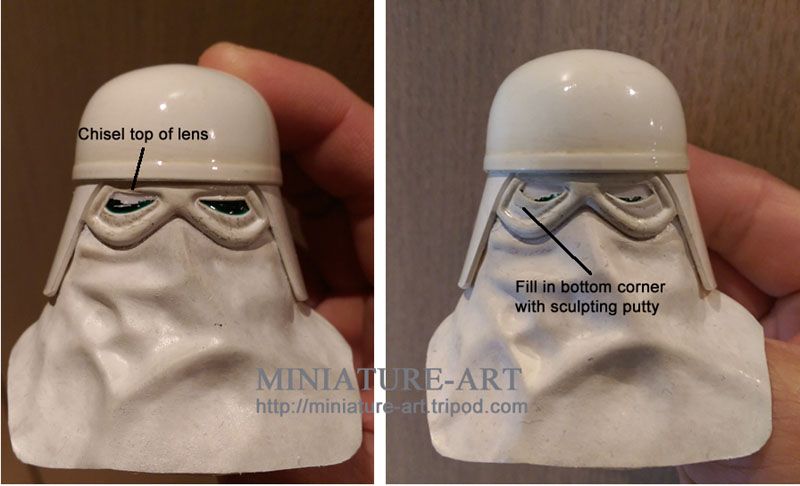
This was accomplished by chiseling the correct shape higher up closer to the brow, and filling in the bottom portion of the lens with Magic Sculpt epoxy putty. When it was dry the entire lens area was wet sanded, the edges neatened up and sharpened and refined as necessary. I then repainted and weathered the lens portion to match the rest of the helmet, and a clear gloss restored the original sheen.
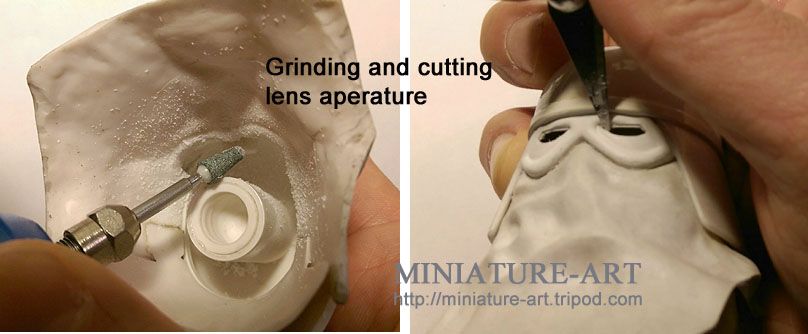
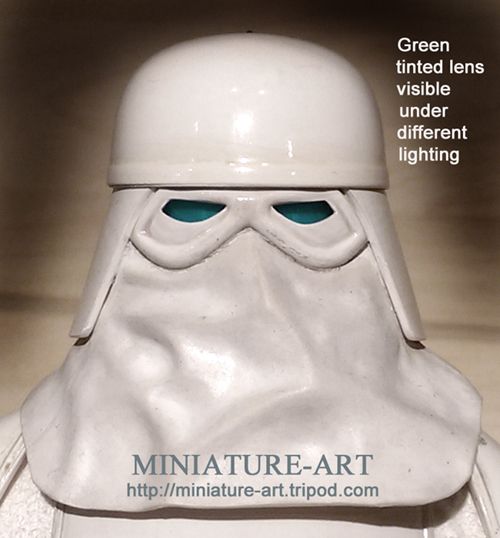
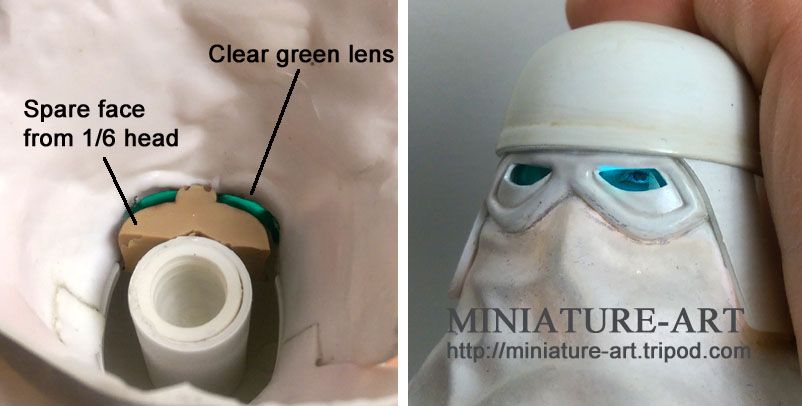
Sideshow did a magnificent job replicating the dark green lens with paint. Recently I had a opportunity to inspect Hot Toys Stormtrooper, and I noticed their figure used a clear green lens like the actual costume. With this inspiration, I decide to incorporate dark green lens on my Snowtrooper as well.
I used a Dremel tool with a tiny drum sanding bit to thin away the inside of the visor from behind. When it was paper thin, I cut away the lens aperture and sanded the area smooth to hide the tooling marks. I then cut clear green plastic and glued it to the back of the visor. Under normal viewing the lens appear almost black, but in direct light it appears green, a feature seen on the actual costume as well.
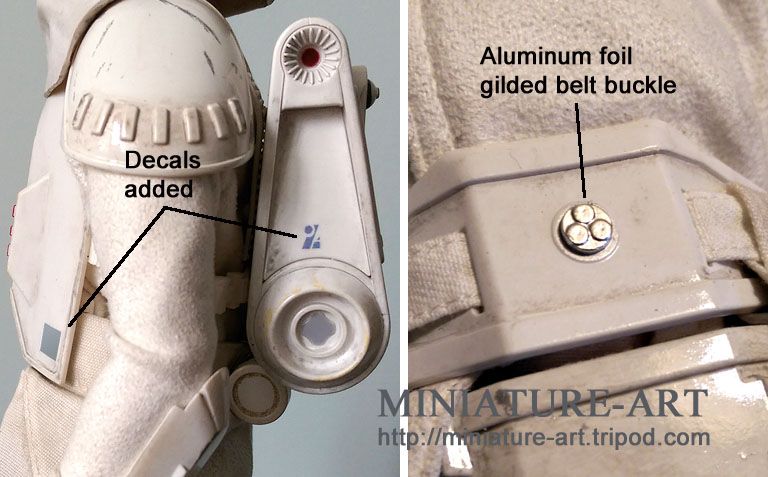
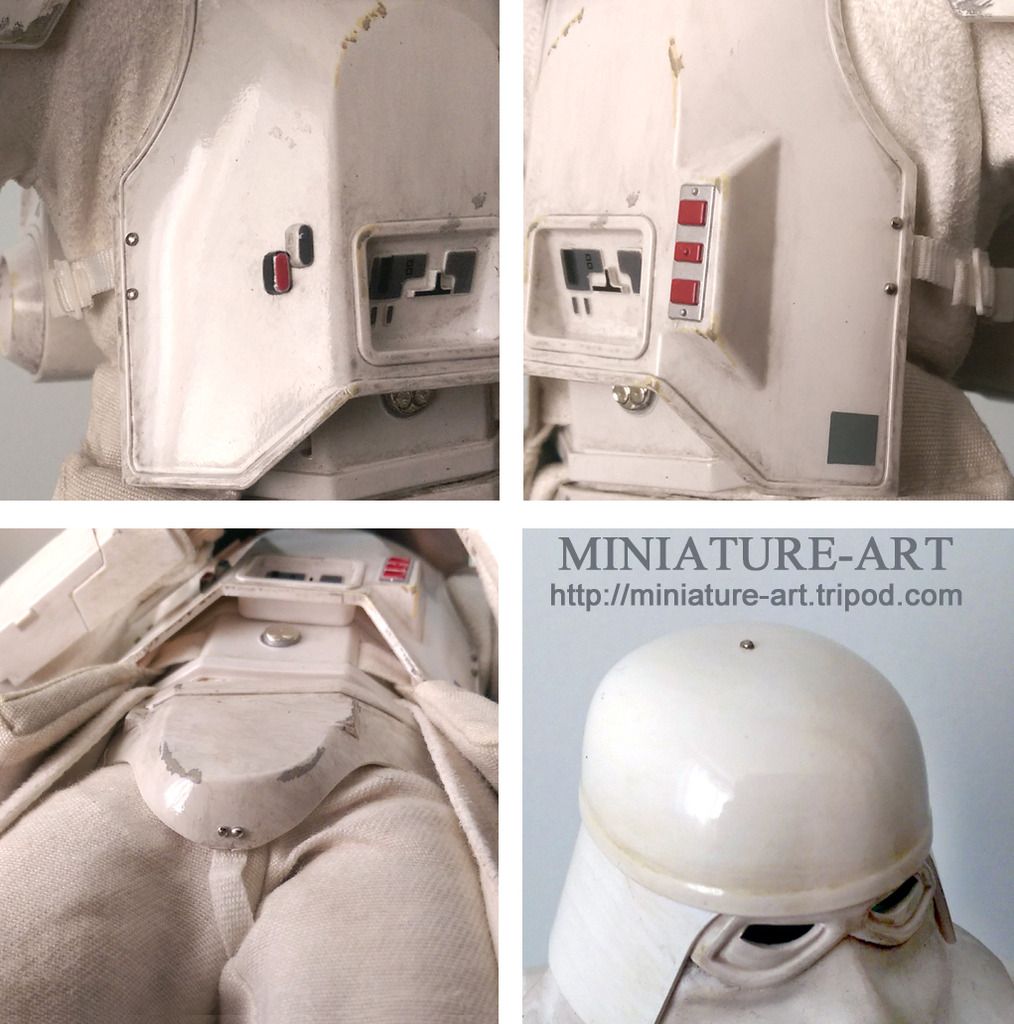
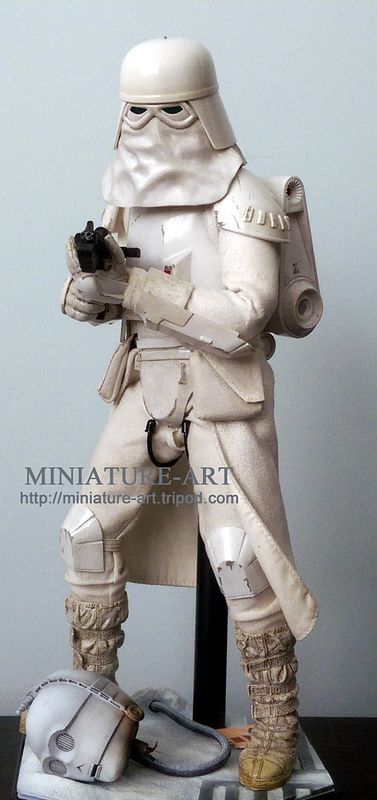
Decals- The figure is missing two small painted items.....a logo on the left side of the backpack, and a small square on the bottom left edge of the chest plate. I printed out decal versions of the missing items from modified art in Photoshop, after application the decals were sealed under a layer of clear gloss.
Belt buckle- The belt buckle was gilded with a piece of polished aluminum foil. This is entirely my personal preference, as it felt it looked more realistic than silver paint.
Rivets- The armor is missing the tiny rivets securing the straps to the armor. A pair is found on the left and right sides of the chestplate, and another pair at the bottom of the groin armor. Finally a single rivet secures the chin strap at the top of the helmet. The 1/6 rivets/fasteners were simulated with cut off flat pin heads glued in place.
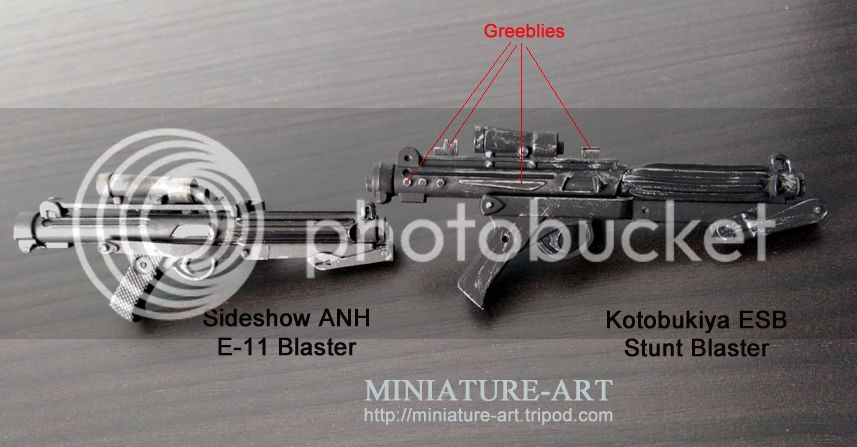
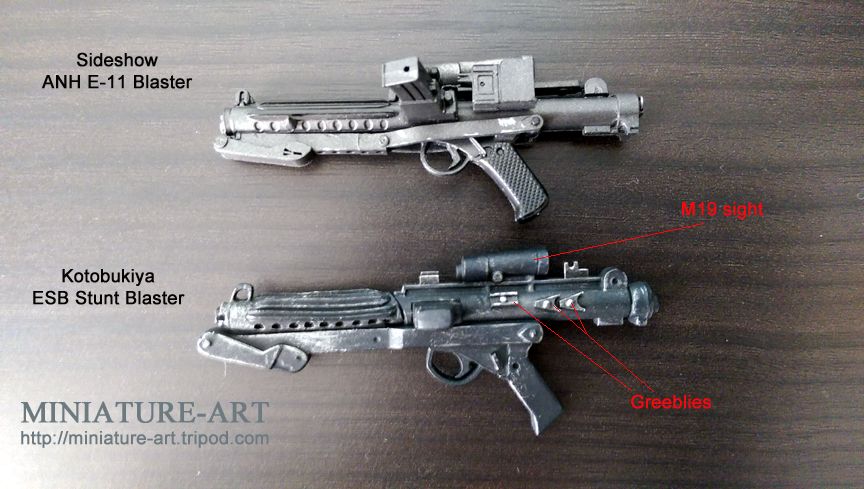
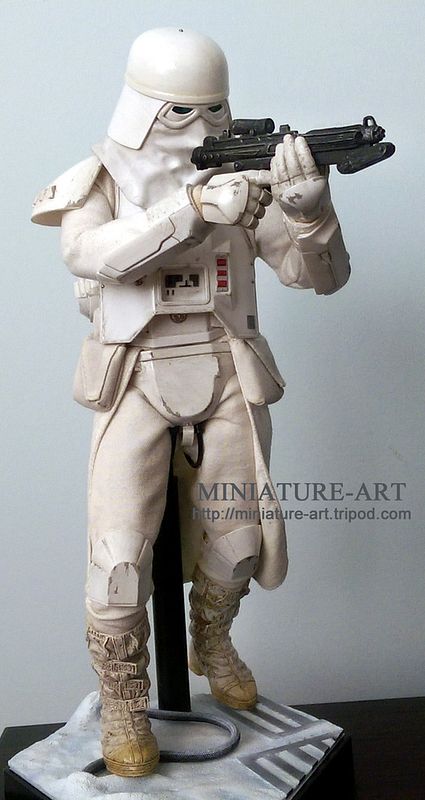
E-11 ESB Stunt Blaster- Snowtroopers were seen on screen and in promotional pictures using both the modified Sterling machine guns from ANH, as well as a simpler all resin (non-firing/non-functional) stunt blaster. Fortunately the Kotobukiya 1/6 Snowtrooper statue features the ESB style stunt blaster. With a few additional “greeblies” made from from thin plastic card, the ESB style stunt blaster further sets the Snowtrooper apart from the regular Stormtroopers in 1/6 scale perfectly.
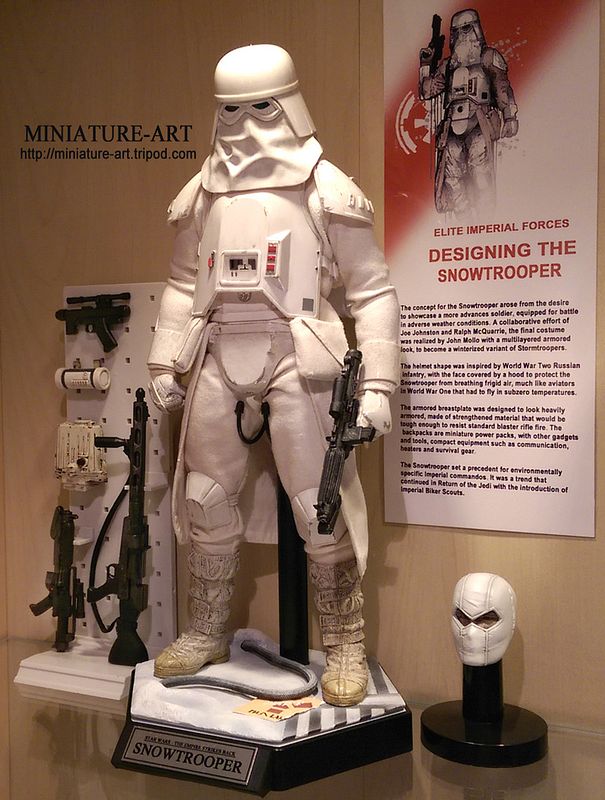
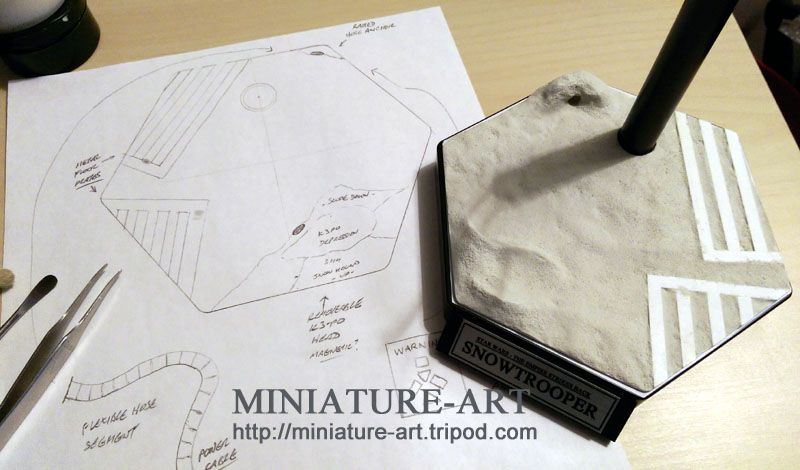
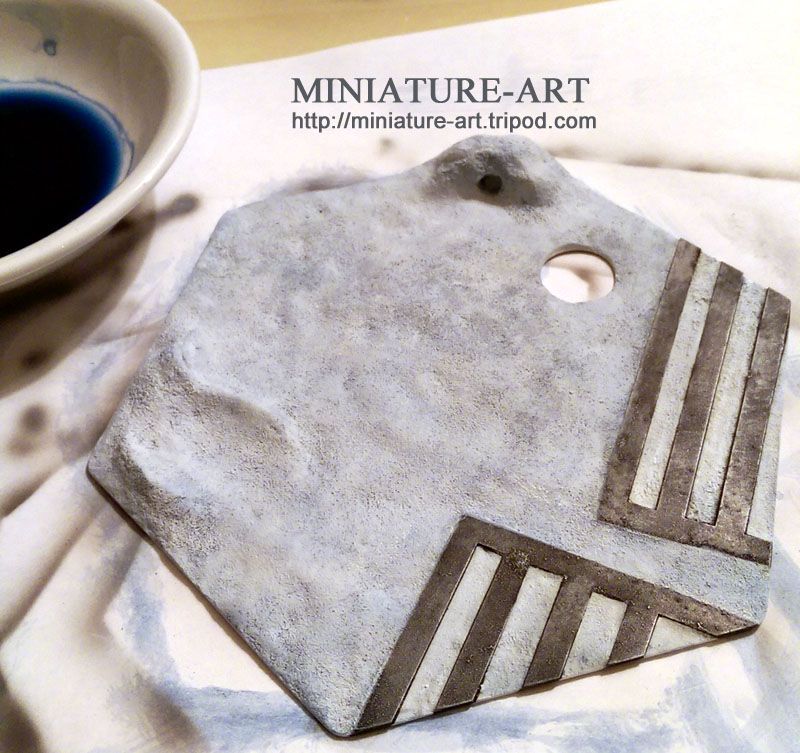
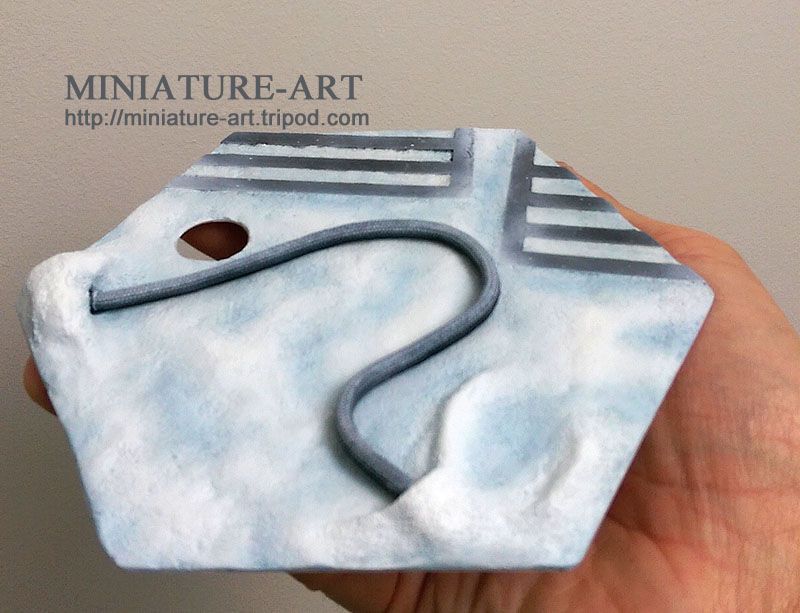
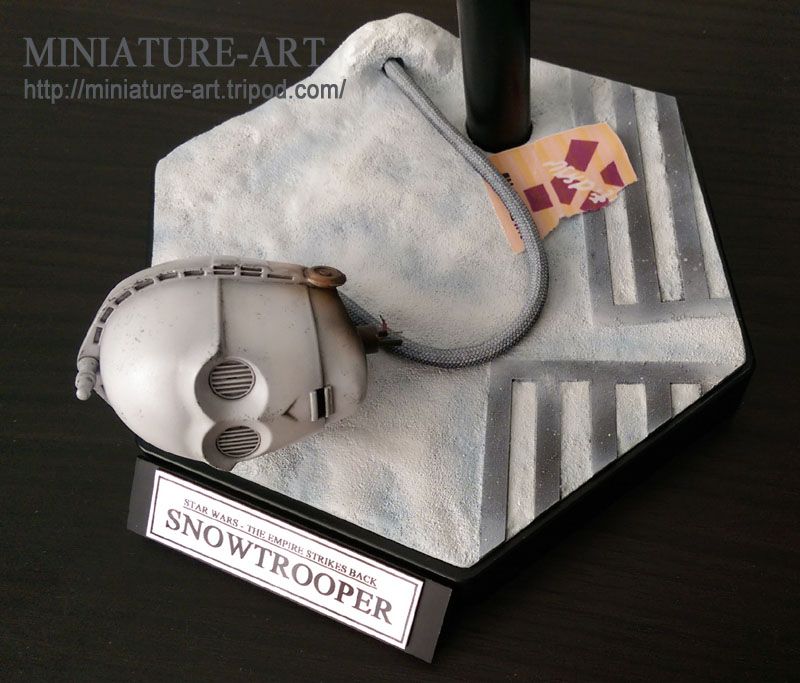
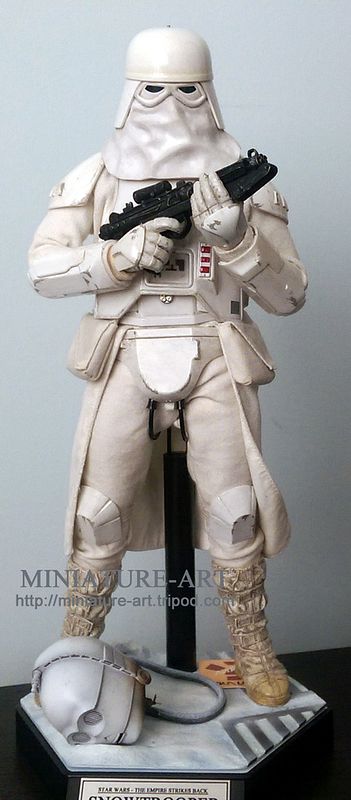
Display Base- In the past year Sideshow started to release their figures in a raised hex base. I really like the extra space provided, I decided to add sculpted details so the base would be a miniature diorama. I used a 0.30” sheet of plastic, cut in a matching hex shape, with small snow drifts made from Magic Sculpt epoxy putty. A ¼” braided nylon rope served as the numerous power cables dotting Echo Base. The metal floor grates were replicated from 0.30” plastic strip. The base was then airbrushed in white with light blue shading and sealed with a gloss acrylic finish.
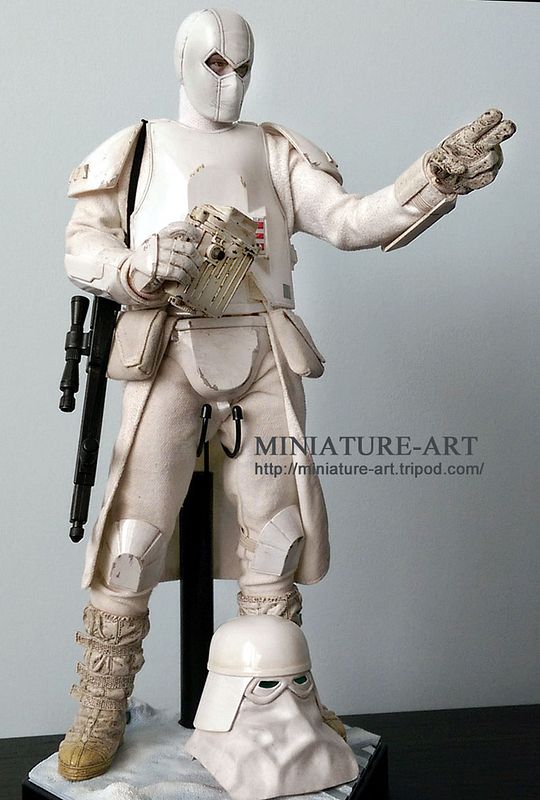
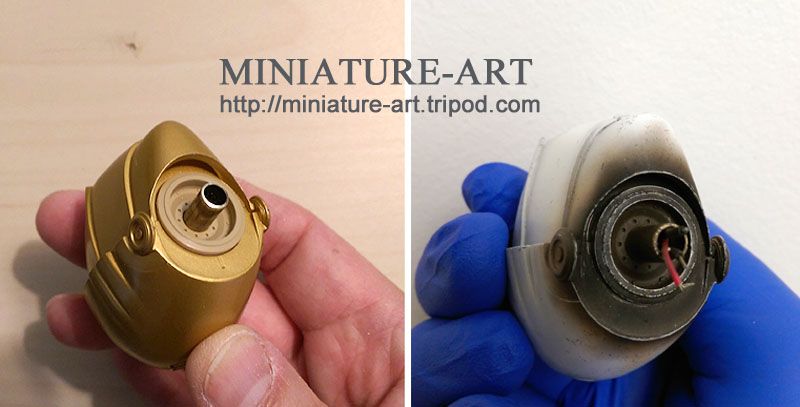
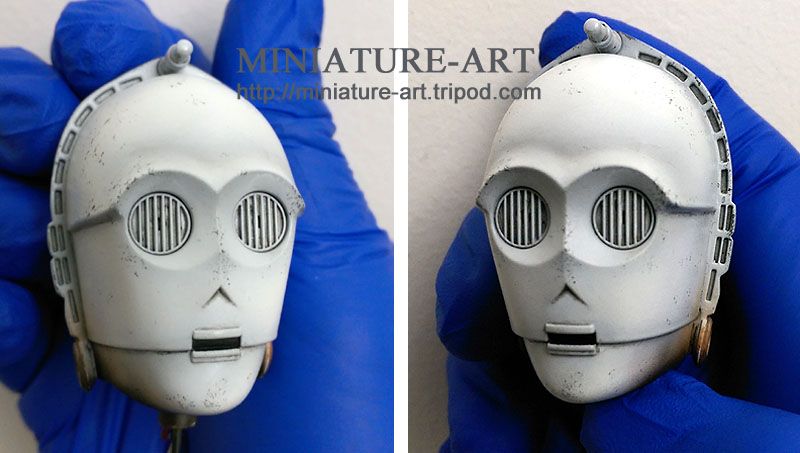
The ¼ scale Exclusive Sideshow Snowtrooper statue came with an striking display option, K-3P0’s destroyed head on the base. I decided it was a great idea, and used a spare C-3PO head with scratch built neck details, and repainted white with appropriate weathering and battle damage.
Both the K-3PO head and power cable attach to the base with hidden magents.
A custom metal nameplate on a riser completed the display.

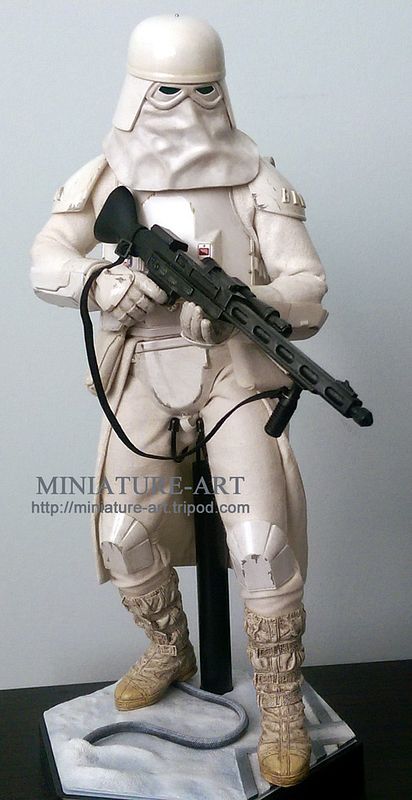
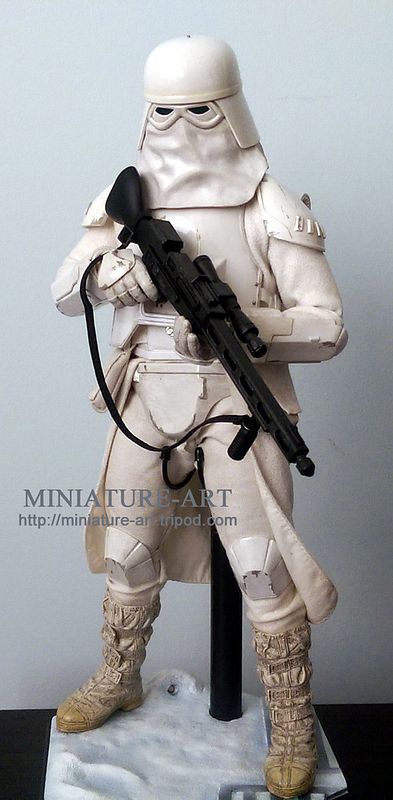
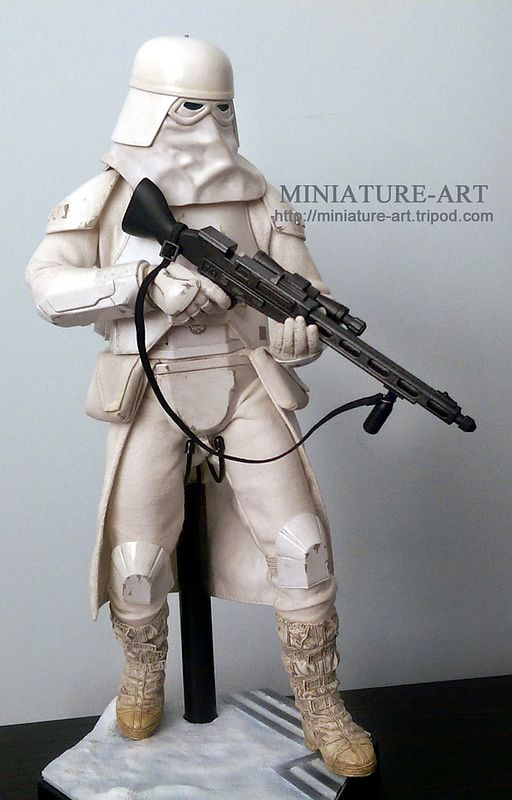
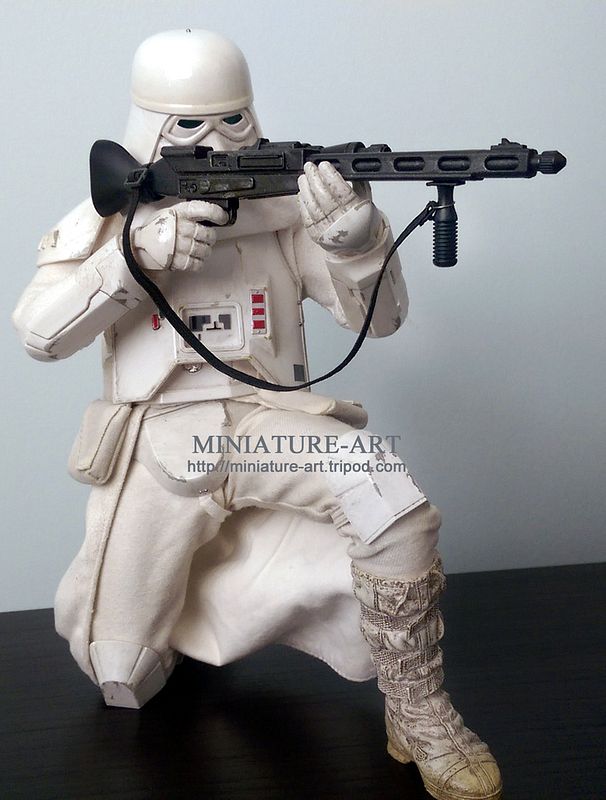
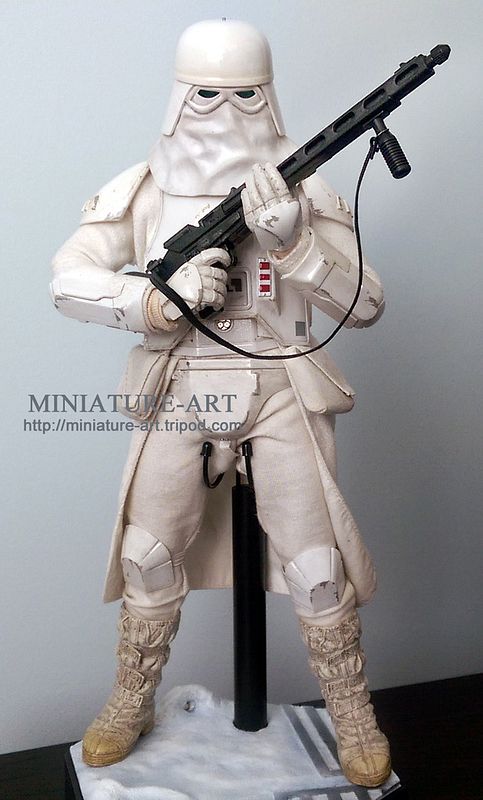
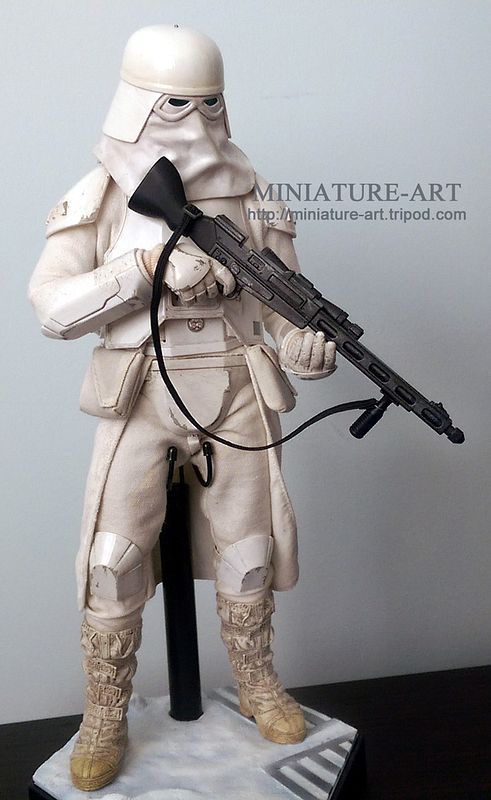
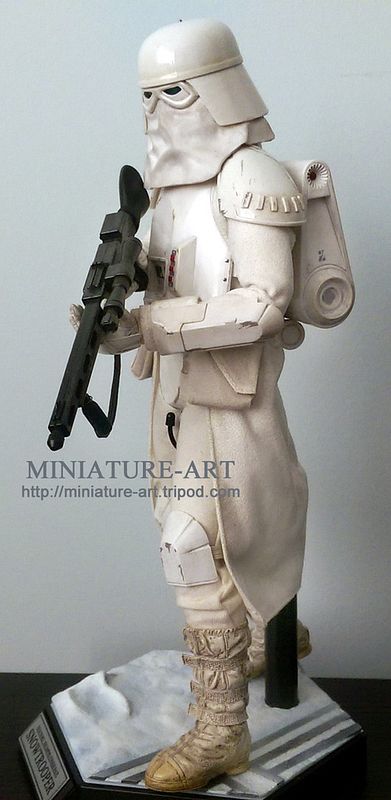
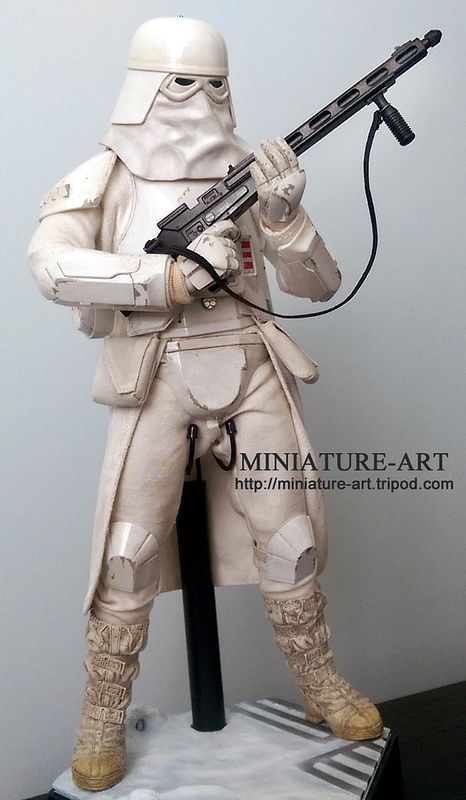
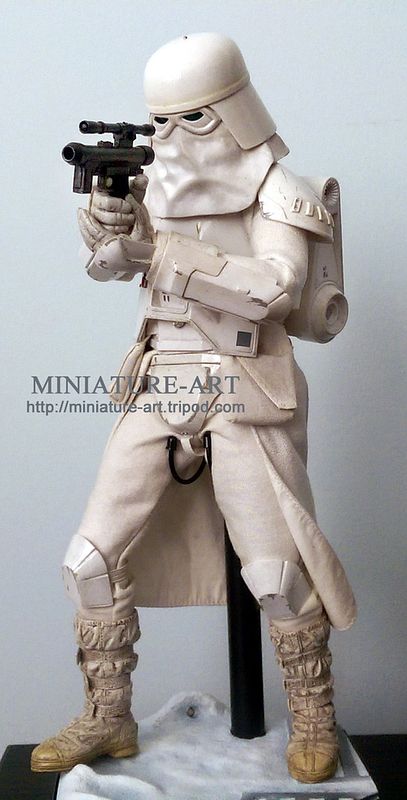
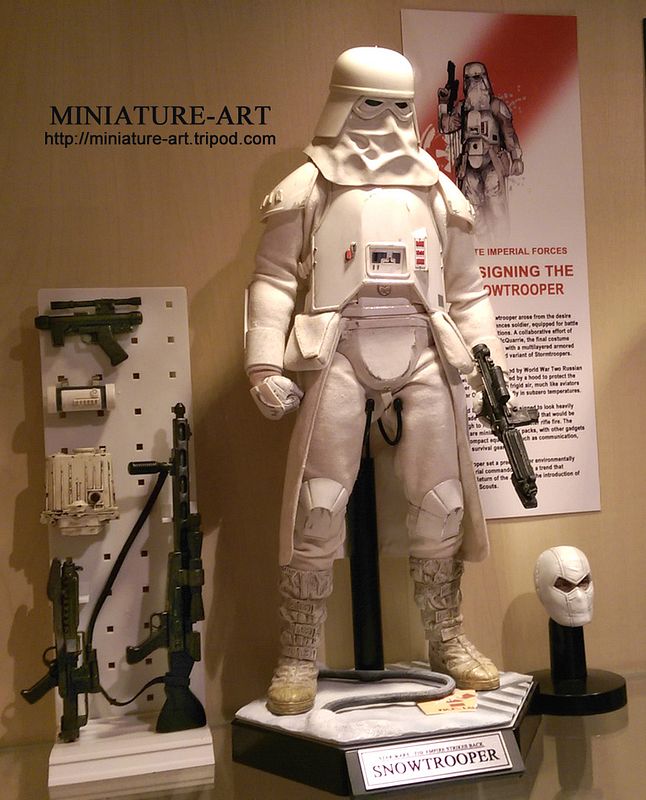
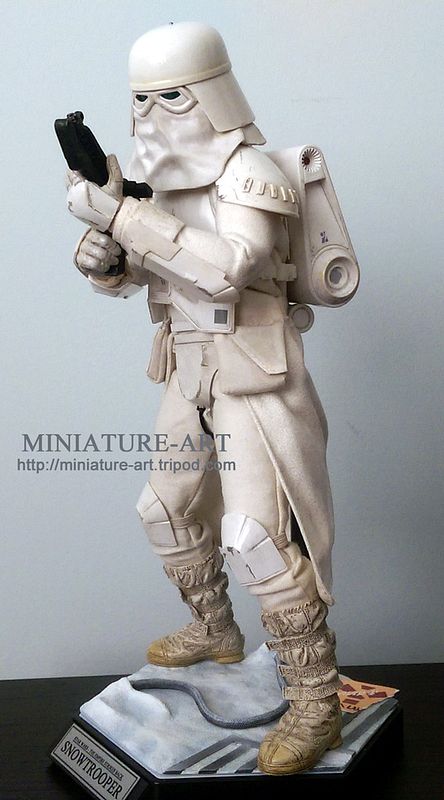
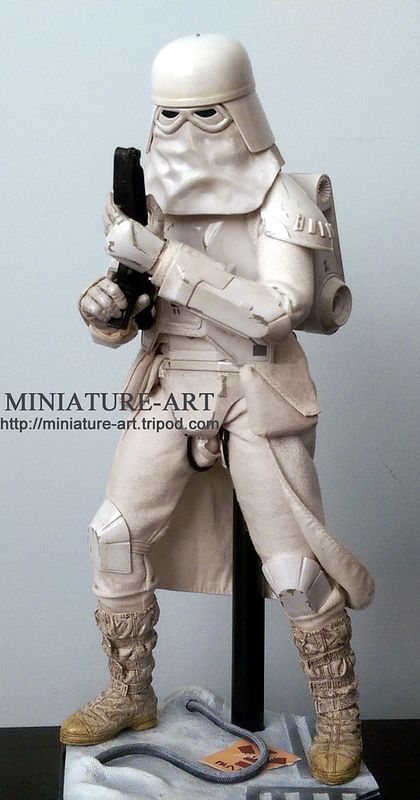
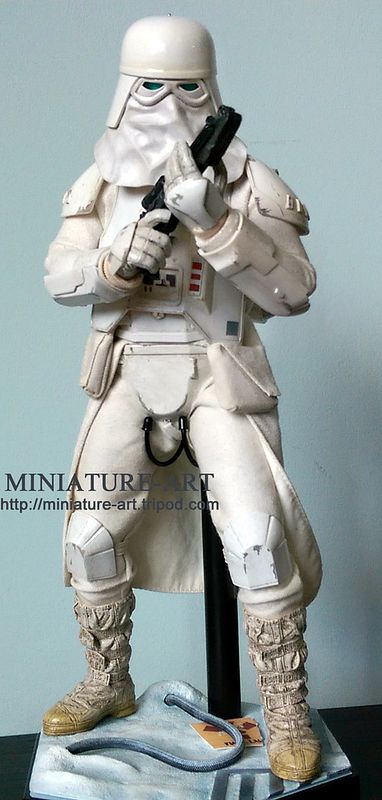
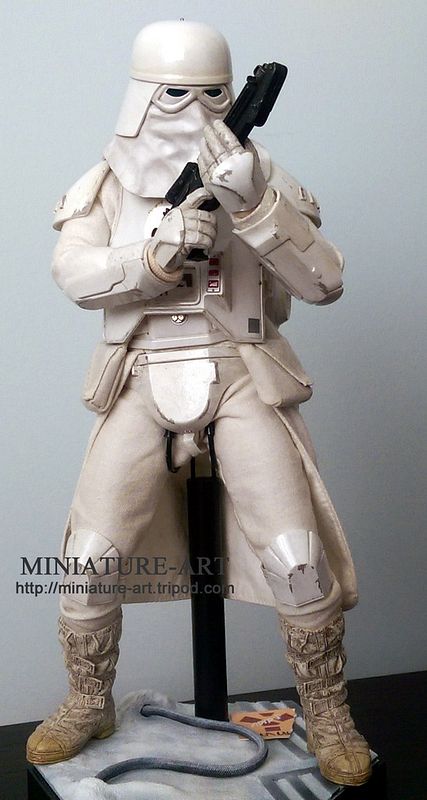
Below are completed pictures of my modified 1/6 Sideshow Snowtrooper on his custom display base. The Snowtrooper has been my favorite Imperial troop design when I first saw Empire Strikes Back as a child. I’ve waited a very long time to get 1/6 ultimate rendition of this character:
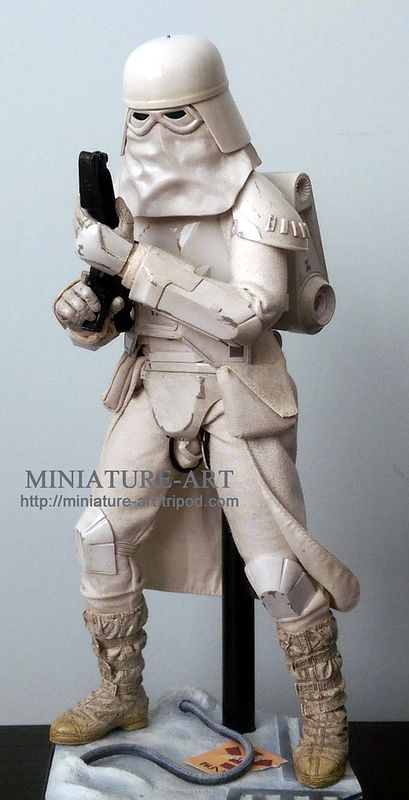
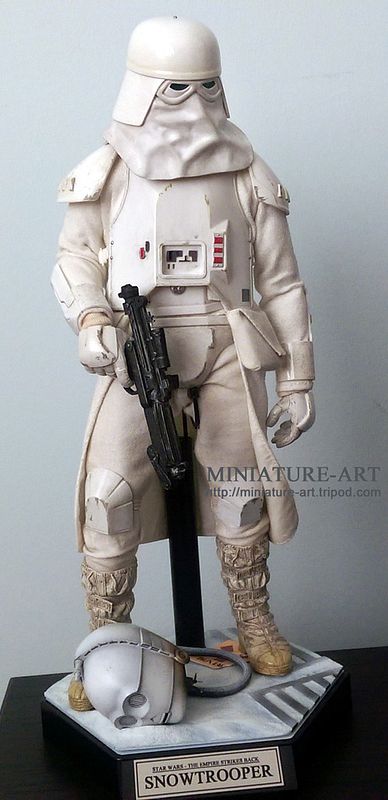
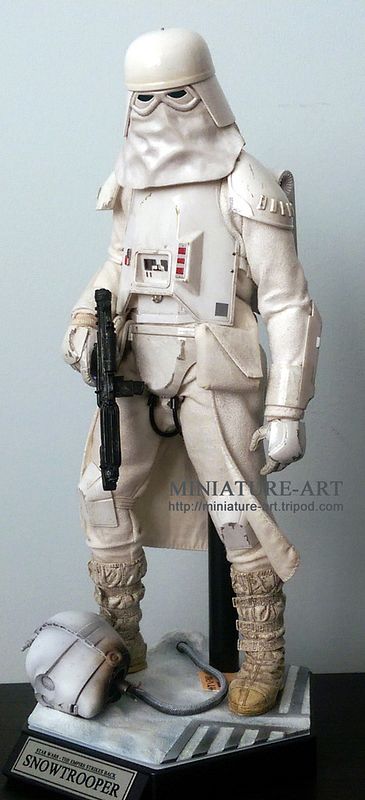
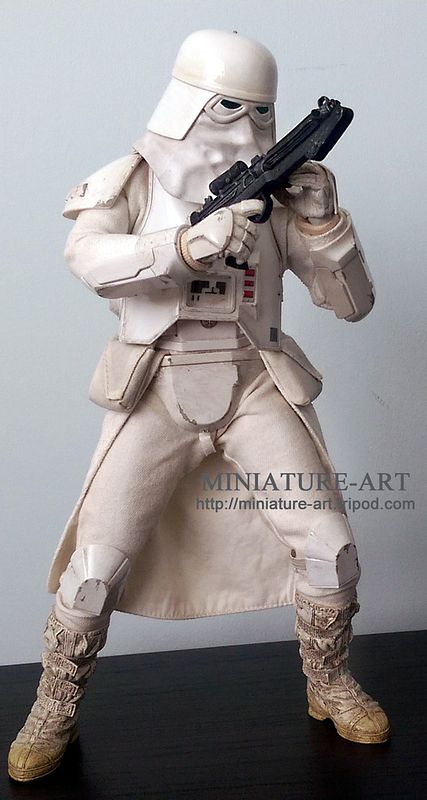
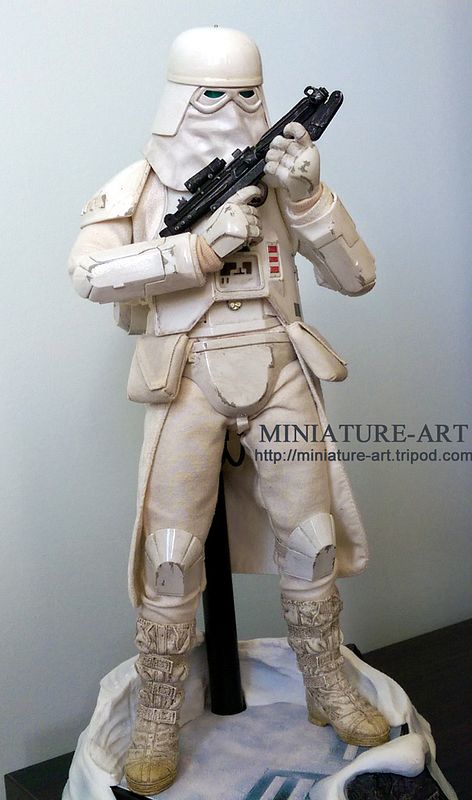
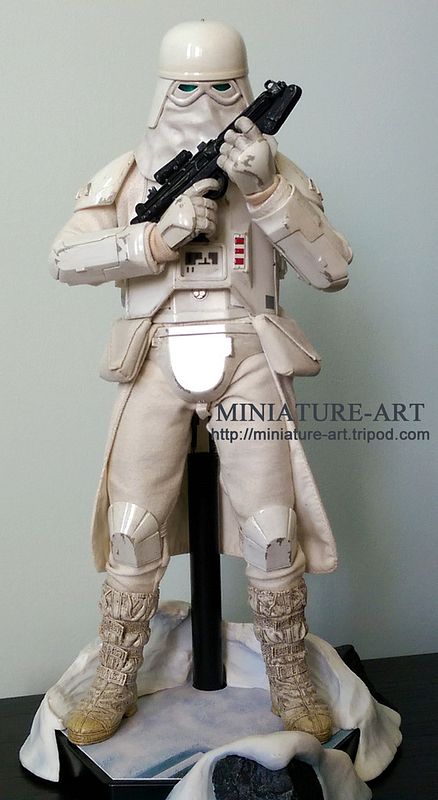
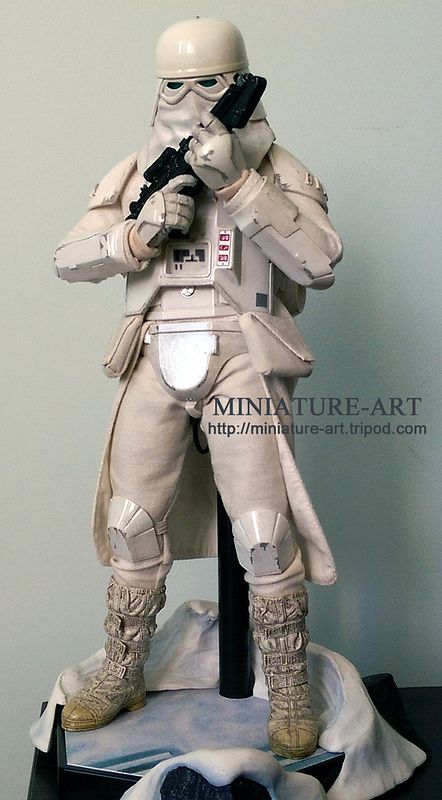
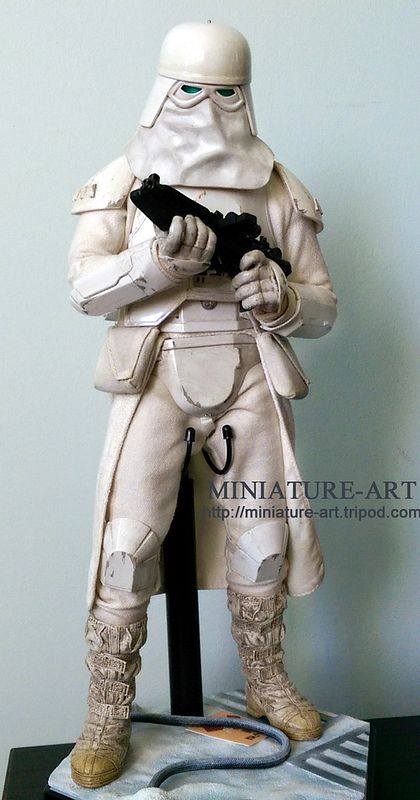
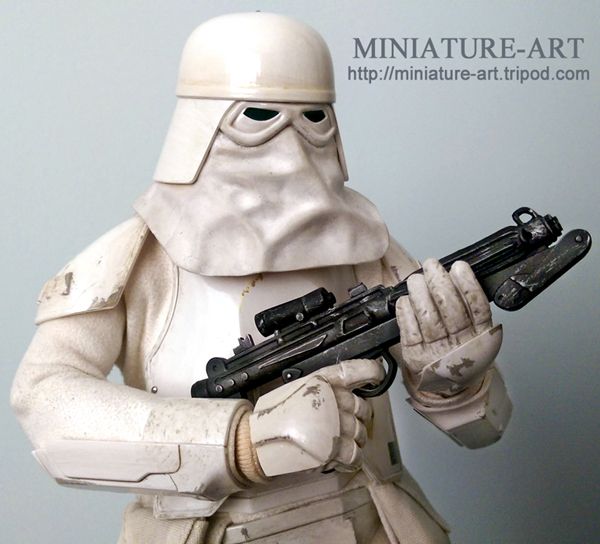
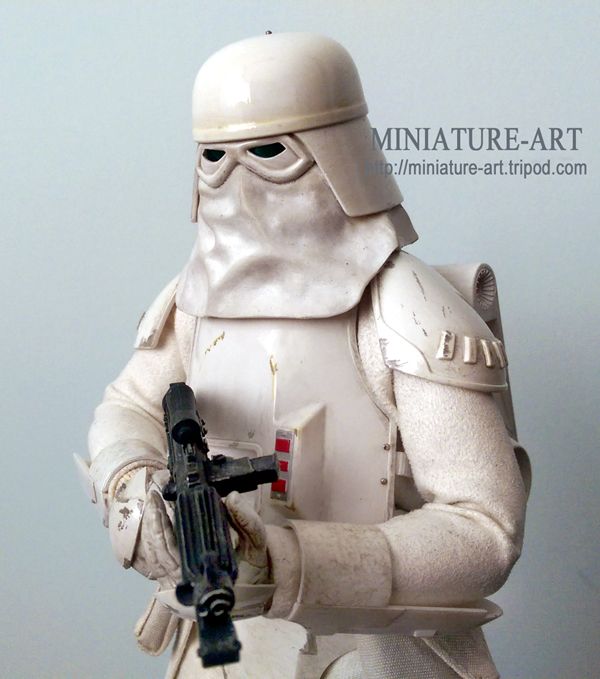
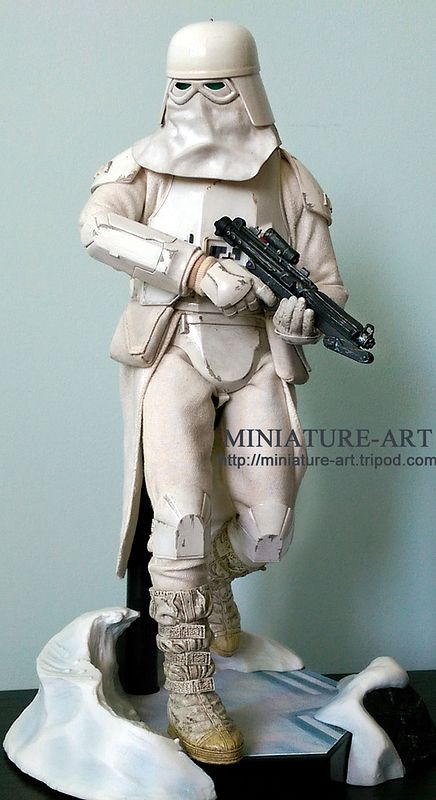
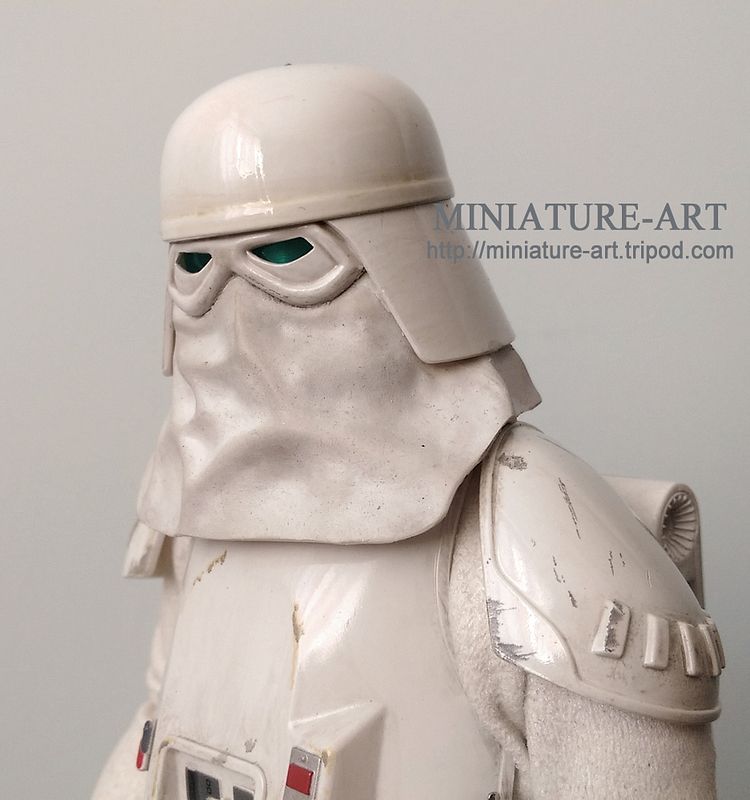
Hope everyone enjoys the pictures!
BOBBY
I think the figure out of the box is excellent, the highlights being the realistic weathering on all the hard armored segments, and sharp tailoring on the different layers of clothing. In addition the separate boot feet and tops allow deep stances. The exclusive vintage Kenner style blaster is a great nod to long time fans of action figures.
As most of you know, I'm a Snowtrooper fanatic, and I've studied the actual costume, even viewing examples as they have gone on various Lucasfilm tours. Over the past two years, I've had an opportunity to refine certain aspects of the Sideshow Snowtrooper, to better reflect screen accuracy and poseability of the figure.

Body swap/joints- I found the stock Sideshow Prometheus body a little loose especially in the hips. In addition the body did not pose as naturally as my favored body, the Hot Toys True Type. I used a newer version of this body which has longer ankle sockets and the longer barbell style ankle joints, resulting in a slightly taller figure.


I used the original Sideshow neck, as it didn't change the height of the helmet on the shoulders and fortunately it fit the Hot Toys True Type body without modification.
The feet were removed from the Sideshow prong style ankle joints by immersing the foot in hot water. When the foot was pliable, a pair of Hot Toys barbell ankle joints were simply pushed into the aperture.

Hands and wrist joints- I prefer Sideshow's wrist pegs, they are molded in a white color and the longer pegs are more secure. To adapt them to fit into the True Type body, I deepened the forearm holes with a 11/64"dia drill bit.

The actual Snowtrooper costume used thin gardening gloves, so the thick insulated hands as sculpted by Sideshow looked oversized. I used Sideshow's Prototype Boba Fett's hands as a replacement, cutting down the hand armor to fit and gluing them in place. In addition, a pair of 1/6 half-socks was dyed a light brown color and used to simulate the cuff of the gloves. They are a great way to hide the wrist ball-joint when the hands are flexed.


Cowl- The face cowl on the actual costume was cut flat in the front with the corners slightly rounded off. It was actually rather short and did not extend past the top of the domed portion of the chest plate. I liked the sculpted wrinkles in the Sideshow cowl so I didn't replace it with a thin vinyl material. Instead I trimmed the cowl shorter in front and sides using pictures of the actual costume as reference.
On the costume, the cowl is made of a smooth and shiny vinyl material, so I repainted the cowl in a brighter white color with minimal weathering to be more accurate.

Lens- The biggest complaint most people had with the figure was the "squinty" eyes that looked too small. The original CAD drawings of the Sideshow sculpt showed accurate sized eyes so an error must have been made during production. Upon closer inspection, simply enlarging the eye holes wouldn't suffice. The problem was the lens shape was entirely wrong and too low on the visor/faceplate as well.
I realized fixing the lens shape and location will require a bit of work, precision one at that, and I would need to match the shape as well from left to right side. Looking at actual costume images of the Snowtrooper helmet, I realized that even on the actual costume the lens weren't symmetrical from left to right. So my aim was to correct the lens shape as accurately as I can by resculpting them in a higher position. Below is a template of the corrected lens shape I used on my figure.

This was accomplished by chiseling the correct shape higher up closer to the brow, and filling in the bottom portion of the lens with Magic Sculpt epoxy putty. When it was dry the entire lens area was wet sanded, the edges neatened up and sharpened and refined as necessary. I then repainted and weathered the lens portion to match the rest of the helmet, and a clear gloss restored the original sheen.


Sideshow did a magnificent job replicating the dark green lens with paint. Recently I had a opportunity to inspect Hot Toys Stormtrooper, and I noticed their figure used a clear green lens like the actual costume. With this inspiration, I decide to incorporate dark green lens on my Snowtrooper as well.
I used a Dremel tool with a tiny drum sanding bit to thin away the inside of the visor from behind. When it was paper thin, I cut away the lens aperture and sanded the area smooth to hide the tooling marks. I then cut clear green plastic and glued it to the back of the visor. Under normal viewing the lens appear almost black, but in direct light it appears green, a feature seen on the actual costume as well.


Decals- The figure is missing two small painted items.....a logo on the left side of the backpack, and a small square on the bottom left edge of the chest plate. I printed out decal versions of the missing items from modified art in Photoshop, after application the decals were sealed under a layer of clear gloss.
Belt buckle- The belt buckle was gilded with a piece of polished aluminum foil. This is entirely my personal preference, as it felt it looked more realistic than silver paint.

Rivets- The armor is missing the tiny rivets securing the straps to the armor. A pair is found on the left and right sides of the chestplate, and another pair at the bottom of the groin armor. Finally a single rivet secures the chin strap at the top of the helmet. The 1/6 rivets/fasteners were simulated with cut off flat pin heads glued in place.

E-11 ESB Stunt Blaster- Snowtroopers were seen on screen and in promotional pictures using both the modified Sterling machine guns from ANH, as well as a simpler all resin (non-firing/non-functional) stunt blaster. Fortunately the Kotobukiya 1/6 Snowtrooper statue features the ESB style stunt blaster. With a few additional “greeblies” made from from thin plastic card, the ESB style stunt blaster further sets the Snowtrooper apart from the regular Stormtroopers in 1/6 scale perfectly.


Display Base- In the past year Sideshow started to release their figures in a raised hex base. I really like the extra space provided, I decided to add sculpted details so the base would be a miniature diorama. I used a 0.30” sheet of plastic, cut in a matching hex shape, with small snow drifts made from Magic Sculpt epoxy putty. A ¼” braided nylon rope served as the numerous power cables dotting Echo Base. The metal floor grates were replicated from 0.30” plastic strip. The base was then airbrushed in white with light blue shading and sealed with a gloss acrylic finish.


The ¼ scale Exclusive Sideshow Snowtrooper statue came with an striking display option, K-3P0’s destroyed head on the base. I decided it was a great idea, and used a spare C-3PO head with scratch built neck details, and repainted white with appropriate weathering and battle damage.
Both the K-3PO head and power cable attach to the base with hidden magents.
A custom metal nameplate on a riser completed the display.


Below are completed pictures of my modified 1/6 Sideshow Snowtrooper on his custom display base. The Snowtrooper has been my favorite Imperial troop design when I first saw Empire Strikes Back as a child. I’ve waited a very long time to get 1/6 ultimate rendition of this character:


Hope everyone enjoys the pictures!
BOBBY
Last edited:


